Hello and Welcome!


Welcome to my little place in the blogging world. :)
I like to share details here for the DT projects I create and also some of my own tutorials.
I would love you to leave me a comment so I know that you have visited me.
Thanks for stopping by! Ni :) x

Sunday, 23 September 2012

Easy Swing Card - Photo Tutorial

Good morning everyone, well finally I have made it back here to post my tutorial for the style of Swing Card (aka. Flip Card) that I shared in my previous post.

After showing this technique to a large number of crafters at my Docrafts demonstrations over recent months it was decided that my traditional style of demo freebie written tutorial sheets would be much too complicated for this technique and so a photo tutorial with notes has been created.
Bare with me, I hope it makes sense, please let me know if you think any changes need to be made and I'll update as requested. :)


Remember, I have used my parenthesis rectangle no.2 dies from xcut but you can use any symmetrical shape that has an easily identifiable centre (I will do a quick post this week showing how to easily use a circle too!). These measurements make a 5 1/4" card.

Ok so without further ado here is the tutorial in 10 very easy steps.....
*******
1. -  First take a sheet of card that measures 7 1/4" by 5 1/4".
2. - Work with the card horizontally and score at 2 3/4" and 3 3/4"

*******
3. - Next take you chosen die and place it on top of the card, lining up the centre of the die with the
2 3/4" score line.
4. - Tape the die into place with low tack tape (stick onto clothes if necessary to de-sticky it a little so it will not rip your card when removed). Place the tape over the small middle panel as shown below, this is a good visual reminder of where not to cut or you will ruin the swing mechanism!


*******
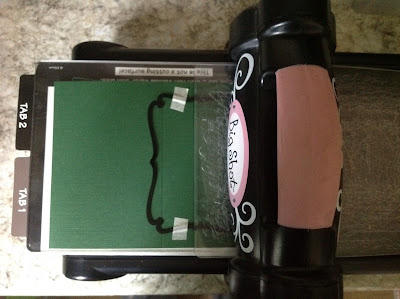
5. - Place the card on the base plate of your chosen die cutting machine and feed the top plate through and line it up with the 3 3/4" score line as shown below. Remember, don't cover the tape! Roll through your machine.
By making your sandwich is this staggered way, when you roll it through your machine you will only cut where the sandwich is complete, so in this case the small area on the right side of the score line.


*******
6. - Once out of the machine, turn your card round 180 degrees and make up a new staggered sandwich to cut the other side of the die, as again shown in the photo below. Remember, don't cover the tape! Roll through your machine.
7. - Once cut, remove the die and lay the card horizonally as before.


*******
8. - Now fold the left side of your card over towards the right edge, creasing at the 3 3/4" score line.
9. - Then fold the same side back to your left creasing on the 2 3/4" score line to give you a finished card blank that will stand like this.....


*******
10. - Decorate as required!
Remember that because you used a die to cut the shaped swing panel you can use the same die for a perfect decorative layer as on the front of my card using the tartan paper, AND you can use the smaller shapes with plain card to create a space to write your message to the recipient.


*******

Right, phew! That's it, tutorial done! Now over to you to see what you think of it!
Thanks for stoping by today, I hope it has been a useful visit and I welcome any comments. Ni. :) x

Monday, 10 September 2012

Boofle Christmas and the tutorial is on its way, promise!

Well here we are again, the beginning of a new alternate month means a new set of Docrafts products being released and the mad week or so that is demo prep time!

This loop is completely Christmas based, sure to get everyone into the Christmas crafting mood!
We have new ranges from Tulip (gorgeous!), Michael Powell (superb!) and the stunning red & white
Home for Christmas with twine, tags, and Nordic inspired designs (I'll upload a few samples over the next couple of weeks). Oh and we must not forget Docrafts newest hot selling character, the knitted cardigan dog that is Boofle!

Now love him or loathe him, bare with me, I have been promising quite a few of the lovely ladies that I have met at my demos recently that I would do you a photo tutorial of the Swing Cards I have been making and I have finally done it and decorated my newest sample using the Boofle collection. :)

Here is the card closed,

and here it is opened up to show the reverse of the swing panel.

I took the photos whilst making my sample so they are all ready to upload, I just need to work out how to write it up clearly now too!
I am away for a few days this week so hopefully it will get finished ready for Friday eve so that when I do my demonstration at the Range, Norwich on Saturday it will already be live, here's hoping!

Right off to the pub for a meal now I think, thanks for stopping by, I hope you will pop back for the tutorial soon. :) Ni. x

Tuesday, 28 August 2012

Docrafts A-Z Challenge, letter T.

Evening everyone, I am sharing a quick card today that I have made for a family member and its the dreaded male card!
Luckily most of my family are catered for now using the super Wellington range from Docrafts as it shows Wellington the bear with many sports and leisure activities, perfect.

This card is for the Docrafts A-Z challenge which is over on their blog. The letter this time is T and the products to be used are tags and twine.

I have used some brown/white twine from my stash and my tag is one of the decorative stamps from the new Docrafts, Home for Christmas range in the Tags set.
The stamp comes with 3 lines in the centre for you to hand write a message or leave blank as an embellishment but I have horrified ladies at my recent demos by cutting my stamps up and so I have removed those lines from my stamp with a craft knife and used a Just Rite sentiment stamp to fill the gap, luckily it's a really good fit! :)
Right, I'm off to do some stamping ready for demo prep with new Docrafts products next weekend! Ni. X


Thursday, 9 August 2012

Guess The Crafty Item - Revealed!

Hiya crafters!
Well there were a few very clever guesses yesterday evening as to what my new exciting crafty item is and here is the answer:

A Promarker Storage Unit!!! :D :D :D Yay!

*** A big well done to the winner chosen at random, ChrisAndCat!!! ***

Please PM me over on Docrafts with your address and I'll get your prize sent before the weekend.
Thanks to everyone who played along. :)


So, I had been saying I wanted a storage unit for my pens as I was getting annoyed with having them in plastic boxes and having to search around for colours. Well after a month or so of dropping hints we set to designing a very basic unit.
What you can't really see from the photo is that the box is 4" deep with a solid back and two lattice effect panels to hold the pens securely. This means it can be turned horizontally for transport to my boyfriends when I craft there over the weekend or if I go to crafty play days at a friends. Clever touch! ;)
Dad drilled all the holes, 180 of them! (for the basic collection, all Seasonal Limited Editions and a few extra just in case!) so we marked the grid out with a pencil as a guide, mounted them on the deep frame and it was pained white.
I am loving how easy it is to find my pens now! :D
No one except crafters would understand how exciting this is, so I hope you've enjoyed my little share. Ni. X

Wednesday, 8 August 2012

A quick competition! Guess the crafty item.....

Good afternoon crafters!
I am so excited about a new crafty item that I have just received, and I will share it in its entirety tomorrow...
but I thought it might be fun to have a 'guess the item' competition with a chance to win a little prize of :
a new pack of Strictly Party, Glitter Sentiments and 3 sets of Anita's Christmas Decorative Toppers!

Ok, so here is the picture below..... it's quite easy really isn't it?! ;)

Leave a comment here with your guess and Docrafts forum name (if applicable) and I will take all the correct guesses and pull one out of a hat tomorrow (Thursday) morning and announce it here on the blog along with the full post about my mystery item!
Good Luck! :D Ni. x