Hello and Welcome!


Welcome to my little place in the blogging world. :)
I like to share details here for the DT projects I create and also some of my own tutorials.
I would love you to leave me a comment so I know that you have visited me.
Thanks for stopping by! Ni :) x
Showing posts with label Tutorial. Show all posts

Sunday, 23 September 2012

Easy Swing Card - Photo Tutorial

Good morning everyone, well finally I have made it back here to post my tutorial for the style of Swing Card (aka. Flip Card) that I shared in my previous post.

After showing this technique to a large number of crafters at my Docrafts demonstrations over recent months it was decided that my traditional style of demo freebie written tutorial sheets would be much too complicated for this technique and so a photo tutorial with notes has been created.
Bare with me, I hope it makes sense, please let me know if you think any changes need to be made and I'll update as requested. :)


Remember, I have used my parenthesis rectangle no.2 dies from xcut but you can use any symmetrical shape that has an easily identifiable centre (I will do a quick post this week showing how to easily use a circle too!). These measurements make a 5 1/4" card.

Ok so without further ado here is the tutorial in 10 very easy steps.....
*******
1. -  First take a sheet of card that measures 7 1/4" by 5 1/4".
2. - Work with the card horizontally and score at 2 3/4" and 3 3/4"

*******
3. - Next take you chosen die and place it on top of the card, lining up the centre of the die with the
2 3/4" score line.
4. - Tape the die into place with low tack tape (stick onto clothes if necessary to de-sticky it a little so it will not rip your card when removed). Place the tape over the small middle panel as shown below, this is a good visual reminder of where not to cut or you will ruin the swing mechanism!


*******
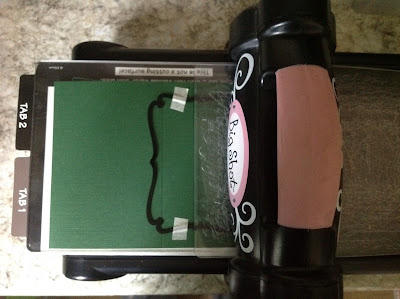
5. - Place the card on the base plate of your chosen die cutting machine and feed the top plate through and line it up with the 3 3/4" score line as shown below. Remember, don't cover the tape! Roll through your machine.
By making your sandwich is this staggered way, when you roll it through your machine you will only cut where the sandwich is complete, so in this case the small area on the right side of the score line.


*******
6. - Once out of the machine, turn your card round 180 degrees and make up a new staggered sandwich to cut the other side of the die, as again shown in the photo below. Remember, don't cover the tape! Roll through your machine.
7. - Once cut, remove the die and lay the card horizonally as before.


*******
8. - Now fold the left side of your card over towards the right edge, creasing at the 3 3/4" score line.
9. - Then fold the same side back to your left creasing on the 2 3/4" score line to give you a finished card blank that will stand like this.....


*******
10. - Decorate as required!
Remember that because you used a die to cut the shaped swing panel you can use the same die for a perfect decorative layer as on the front of my card using the tartan paper, AND you can use the smaller shapes with plain card to create a space to write your message to the recipient.


*******

Right, phew! That's it, tutorial done! Now over to you to see what you think of it!
Thanks for stoping by today, I hope it has been a useful visit and I welcome any comments. Ni. :) x

Wednesday, 25 July 2012

Easel Drawer Box Card - Tutorial

** WARNING! Photo heavy post!**

Well after another long break from blogging I am finally back to share my most recent demonstration tutorial for Easel Drawer Box Cards, or whatever you like to call them!
I had seen a few of these around last year and I made one at Christmas to hold 3" notelets but had not made a tutorial sheet for it, so my craft buddy Joanne and I set to work!

We have made 2 sizes of these projects with different suggested uses.
*The smaller one finishes up at 3" square and will stand up to look like a regular card when the drawer is closed. It is perfect for a small piece of jewellery or a few individually wrapped chocolates as a little gift.

This one was simply decorated using the Wellington range from Docrafts...


*The larger one finishes up at 3 1/2" square which as I mentioned before is perfect for 3" notelets like the ones below that I have decorated using the Lucy Cromwell collection from Docrafts...


And here are my versions using the Enchanted Fairies and Bexley Black ranges.


 ...and finally, here are the size guides. They really are very simple to put together but just remember to use a good weight of card to give it some stability.


Thanks for stopping by, hope I haven't bored you with so many photos! Ni. x


Wednesday, 7 March 2012

Box Pop-Up / Trophy Card Tutorial

Good (but a very dark and rainy!) afternoon.
I'm posting today the previously mentioned tutorial for a box pop up/trophy style card.

This is a relatively new style of card to me but I can already see it becoming useful for displaying very detailed images in an effective way, such as the new Docrafts, Michael Powell scene stamps. Here is a sample from my first demo this month. This image is the exclusive stamp from the new March goody bag that I have coloured in with Zig Kurecolor twins and Promarkers. The border strip was made using the doily dots border punch and the sentiment is from a sheet of Michael Powell die-cut toppers.


Ok, here come the instructions.....


Box Pop up Card
(From a 12” x 12” sheet of card)


1. First cut a strip 11cm in width. This will be your card base.
2. From the remaining card cut a strip 9cm in width off the shorter side. This will become your pop up section.
3. Lay the base strip horizontally and score down the short side at lines 1, 3,4 and 6 on the Xcut board.
4. Fold the card on the line 6 score and trim off the narrow strip of excess card. Unfold.
4. Rotate the card and repeat the scoring starting from the other short side (score lines 6 will overlap each other).
5. Flip the card over to the reverse and find the line 6, center score. Cut a narrow aperture 1cm in from each edge and a few millimeters in width.
6. Still working on the back of the card. Fold in one of the edge tabs and apply tape to the tab.
7. Slide your pop up section through the aperture and stick it to the tape on the folded tab.
8. Fold the other end of the scored strip over and stick the other tab to the back of the pop up section to complete your card.
Decorate!


*** To make on a score board with measurements. ***
Keep your card at 30cm in length by 11cm width. Score at 2.5cm, 7.5cm, 10cm and 15cm.


There is an exclusive video of this style of card being made in the Docrafts Creativity Club and im sure there are other videos on the internet somewhere that are similar too; or if you are near to one of my demonstrations in the next 2 months I shall be doing frequent demo's of this so you can come along and see it being made in person!
Thanks for stopping by, Ni. :) x

Saturday, 21 January 2012

Sweet / Candle Gift Box Card - Tutorial.

Good afternoon!
Yes, that's right I am actually back for my second post of this week, ok ok, don't fall off your chair in shock lol! ;)
I have been busily uploading some of my DoCrafts demonstration samples and as I am about to upload some examples of the currently popular Gift Box Card I wanted to upload my own set of instructions and a diagram for making them.
You can also see my finished samples further down the post.


So as you can see it really is a very simple process, just 6 simple score lines and then a couple of cuts and there you have it!
If anyone is in the Ipswich area then I will be demoing these cards on Sat 28th at The Range and Sat Feb 11th at Bypass Nurseries if you would like to see a practical tutorial too. :)

Ok so on to my samples, this first one is my original attempt at this technique and has been made into a Thank You card with chocolates inside and features the Hot Diggity Dog range of products.


My second sample uses the adapted instructions for tea light candles and uses the Moments of Faith range...


... and this last picture shows that you do not have to add an aperture and uses one of my favourite products, the Tatty Ted layered die.


I hope this tutorial is of use to anyone who stops by and sees it, I would love to see any cards made using the instructions. Don't forget to check both of my DoCrafts galleries for updates using the new products all this month and in February too. Ni. :) x

Sunday, 4 September 2011

The Day After Demo #1! One sheet Hinged Box - Tutorial

Well, what can I say?!
Such a FABLOUS day!!!!! :)

I left early (remembering this time to eat breakfast to keep my strength up lol!) and arrived in good time to settle myself in.
Terri the owner of The Craft Den was very welcoming and offered me a tea/coffee before the shop opened whilst we were arranged where to put the samples. :)

I think overall that the demo went well, there were lots of people in the shop and I had some very friendly ladies sit for a while to watch me demo the samples and some techniques (and have a craft related chat!) throughout the whole day.
Everyone was so lovely and couldnt have made me feel more welcome and I even had to be reminded that I needed to stop for lunch, especially when the very talented Sue turned up with a GORGEOUS chocolate cake! Yum! :)

Anyway, the point of this post is that I promised to share the measurements for one of the favourite samples of the day, a one sheet of card Hinged Box (aka a Pizza Box).


 A very simple box (even if my diagram doesn't show it!) but there were so many suggestions of different uses for them and ideas for adjusting the size to fit specific items and that along with the fact they are so simple to produce (very quickly!) makes them a big hit!

EDITED TO ADD : Oops! Forgot to mention about the covers.
You can make these using nesties or just rectangles of card slightly larger than your finished box and cut the edges with decorative scissors etc.

Enjoy! Ni. x :)

Sunday, 13 February 2011

Twisted Double Easel Card - Mini Tutorial!

Hi, thanks for stopping by!
This is my first tutorial post and its really only a mini one as it is condensed but hopefully it will help at least one person if they are wondering how to make this style of card! :)


These are my new favourite style of card at the moment and really simple to make:


You need to start with a square piece of card. Mine was 21cm x 21cm which folds to make a DL card size - so you can use a DL card blank and easily find an envelope to fit it in! :)


Fold the square in half and make a cut from the middle of the fold (thats 10.5cm along) down to the bottom edge of the card.


Score from the middle of the fold (same point that you made your cut from) on a diagonal angle down to the bottom corners of the card and then mountain fold all the score lines to give you this:


Next cut 2 topper squares of card at 10.5cm x 10.5cm and attach to the front triangles on the base card. Remember, only stick the squares to the two 'inner' triangles on your base card or it wont fold and work as an easel. I made a note of where to put the glue in the pic above so I dont forget!


Lastly, make a stopper however you wish, mounted onto foam pads to lean the topper squares against.
I used two circles on the FH challenge entry in my last post and the one below is just a strip of card that I decorated with a border punch.


That's it, card base complete! Told you it was simple! :)


***


Here is another double easel card I recently created for two DC challenges so you can see a finished sample:


This was for the:

* The ABC Colour Challenge 'J', colours Jet Black and Jasmine Yellow.

* Clare Curd's Weekly Sketch Challenge.


Hope the tutorial is ok, any comments/friendly criticsms welcome!
Thanks for stopping by! Ni x