Hello and Welcome!


Welcome to my little place in the blogging world. :)
I like to share details here for the DT projects I create and also some of my own tutorials.
I would love you to leave me a comment so I know that you have visited me.
Thanks for stopping by! Ni :) x
Showing posts with label Demonstrator Samples. Show all posts

Sunday, 3 February 2013

Build A Scene dies - no.1 Garden Party

Oops! With a busy weekend and the same sort of start to last week I just could not get time to blog in between work and demo prep and then by the time I did I was falling asleep! I'll be sure to share 2 projects this week to make up for it! :)

Anyway I am here today sharing projects using the new Xcut Build A Scene dies, Garden Party. I have been using these die sets a lot at my demos after many enquiries from customers about how best to use them. Now, remember, although they are called Build A Scene and are obviously designed to build an overall full picture, don't feel restricted by that concept, you can just use selected elements as I have done here.


I have cut the single elements from Kraft card (still addicted to it!) and then on the 'orange' card (inspired from a project by Docrafts very own Jo Austin!) I also used the Artiste orange ink to edge the pieces. I didn't think of this on the 'party' card (I blame being super tired at the time!) which is a shame as that tiny bit of ink really does add dimension.

The party card also uses an element from the Nautical set, no boats there I hear you say?! Although if you look at the edge of the shelf/table the crockery is sitting on, yes that's it, a scalloped edge border. Its the 'wave' strip but instead of keeping the wave edge I kept the 'waste' cut and got a cute scalloped border, this die is now saying permanently in my kit, love it!

The bunting on both cards is from the Garden Party set but again instead of using the full shape I have cut it into smaller pieces. Instead of using solid coloured card why not try a patterned paper or paper piece them by snipping the individual flags from multiple solid and patterned papers, the combinations are endless, its another permanent addition to my die folder!


The paper, buttons and twine are from another new range, Spots And Stripes Capsule collection, a gorgeous range that is perfect as an every occasion stand by. Great pastel tones and generic spot or stripe patterns means this can team up with any stamped images, toppers or decoupage coloured in similar tones, and would work for birthday, thank you, get well, even love themed cards.

Here is another project using individual elements of the the dies along with the 12" double sided Designstax card from the Capsule Collection: 


How cute it that! It is called a Tea Bag & Cookie Holder, there is a pocket on each side of the holder and in the middle you suspend a cellophane bag containing a gift. I have made a mini note card for this example but on another version I have used a decorated tag to add my message. Instead of a tea bag why not add a store gift card to the reverse pocket, or a Lemsip if someone is ill. You can use the central bag for small edible items, jewellery or what about a crafty gift of die cuts, bows, small lengths of ribbon, buttons and brads? That would be sure to put a smile on anyones face!

Now I take no credit whatsoever for the creation of this project, I found the instructions whilst looking for projects to utilise double sided papers. The original idea was created by Debi Pippin and here is her blog post containing lots of samples and a video. Also Chiaki Haverstick has made a PDF tutorial using Debi's measurements which makes it really easy to understand, a huge thanks to both of these ladies for their work and for sharing it. :D

Well versatility definitely seems to be the theme of today's post! Keep looking at your crafty stash in many different ways to get as much use from it as you can! I'll be back on Tuesday (promise!) with more Creativtiy Club DT creations and again at the weekend to share projects using another Build A Scene set.

Sunday, 23 September 2012

Easy Swing Card - Photo Tutorial

Good morning everyone, well finally I have made it back here to post my tutorial for the style of Swing Card (aka. Flip Card) that I shared in my previous post.

After showing this technique to a large number of crafters at my Docrafts demonstrations over recent months it was decided that my traditional style of demo freebie written tutorial sheets would be much too complicated for this technique and so a photo tutorial with notes has been created.
Bare with me, I hope it makes sense, please let me know if you think any changes need to be made and I'll update as requested. :)


Remember, I have used my parenthesis rectangle no.2 dies from xcut but you can use any symmetrical shape that has an easily identifiable centre (I will do a quick post this week showing how to easily use a circle too!). These measurements make a 5 1/4" card.

Ok so without further ado here is the tutorial in 10 very easy steps.....
*******
1. -  First take a sheet of card that measures 7 1/4" by 5 1/4".
2. - Work with the card horizontally and score at 2 3/4" and 3 3/4"

*******
3. - Next take you chosen die and place it on top of the card, lining up the centre of the die with the
2 3/4" score line.
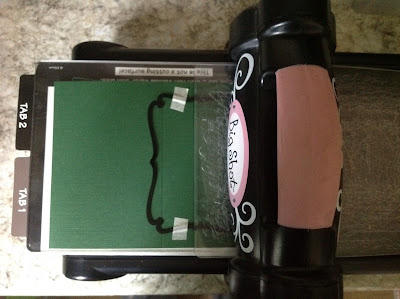
4. - Tape the die into place with low tack tape (stick onto clothes if necessary to de-sticky it a little so it will not rip your card when removed). Place the tape over the small middle panel as shown below, this is a good visual reminder of where not to cut or you will ruin the swing mechanism!


*******
5. - Place the card on the base plate of your chosen die cutting machine and feed the top plate through and line it up with the 3 3/4" score line as shown below. Remember, don't cover the tape! Roll through your machine.
By making your sandwich is this staggered way, when you roll it through your machine you will only cut where the sandwich is complete, so in this case the small area on the right side of the score line.


*******
6. - Once out of the machine, turn your card round 180 degrees and make up a new staggered sandwich to cut the other side of the die, as again shown in the photo below. Remember, don't cover the tape! Roll through your machine.
7. - Once cut, remove the die and lay the card horizonally as before.


*******
8. - Now fold the left side of your card over towards the right edge, creasing at the 3 3/4" score line.
9. - Then fold the same side back to your left creasing on the 2 3/4" score line to give you a finished card blank that will stand like this.....


*******
10. - Decorate as required!
Remember that because you used a die to cut the shaped swing panel you can use the same die for a perfect decorative layer as on the front of my card using the tartan paper, AND you can use the smaller shapes with plain card to create a space to write your message to the recipient.


*******

Right, phew! That's it, tutorial done! Now over to you to see what you think of it!
Thanks for stoping by today, I hope it has been a useful visit and I welcome any comments. Ni. :) x

Wednesday, 25 July 2012

Easel Drawer Box Card - Tutorial

** WARNING! Photo heavy post!**

Well after another long break from blogging I am finally back to share my most recent demonstration tutorial for Easel Drawer Box Cards, or whatever you like to call them!
I had seen a few of these around last year and I made one at Christmas to hold 3" notelets but had not made a tutorial sheet for it, so my craft buddy Joanne and I set to work!

We have made 2 sizes of these projects with different suggested uses.
*The smaller one finishes up at 3" square and will stand up to look like a regular card when the drawer is closed. It is perfect for a small piece of jewellery or a few individually wrapped chocolates as a little gift.

This one was simply decorated using the Wellington range from Docrafts...


*The larger one finishes up at 3 1/2" square which as I mentioned before is perfect for 3" notelets like the ones below that I have decorated using the Lucy Cromwell collection from Docrafts...


And here are my versions using the Enchanted Fairies and Bexley Black ranges.


 ...and finally, here are the size guides. They really are very simple to put together but just remember to use a good weight of card to give it some stability.


Thanks for stopping by, hope I haven't bored you with so many photos! Ni. x


Tuesday, 10 April 2012

The end of the Loop!

Wow time has gone so quickly again that I have now completed all my demo's for the current loop of Docrafts products. Tomorrow will be spent unpacking my bags, having a final play with some of the items and then adding it all into my stash ready for the next kit to arrive in a few weeks. :)

Here are a few cards from the demo on Saturday that I wanted to share, which use the recently released Enchanted Fairies range of products:

This first card uses the tutorial from my previous post for the Box Pop-Up cards and some zingy green card with a fairy topper, papers and sentiment.

This is a mini 4" square stepper card using the die cut frames sheet from the Goody Bag as well as the papers and sentiments.

Lastly is the project which was the 'hit' of the day! This is a mini Easel Box Card which I have made specificaly to fit the mini notelets and envelopes from Papermania.

I used a lot more layers and embellishments on this project than is usual for me and I'm really pleased with how it came out. The store loved it so much that I let them keep the sample and promised the customers I will write up a tutorial to take with me for my next demo in June!


All the rest of my samples from this loop, (over 30 in total!) including the Boofle & Michael Powell ranges can be viewed by clicking the link to my Docrafts designer gallery on the right sidebar, thank you to everyone who have left lovely comments already.
Back soon! Ni. x

Tuesday, 17 January 2012

2012 Calendar Series - Cover & January.

Ok so I've failed already at wanting to post at least once a week but hopefully that will change soon as I am looking to get a new smartphone so I can blog direct from that, much more convenient! :)

***

Today I'm sharing a project that will be the first in a series of posts all coming together to make a complete desk calendar for 2012.

I'm hoping that making the page at the start of each month will get me thinking about which cards I need to get made in that month so I can get them ready on time and wont forget anyone, well that's the plan anyway!

Each page/month will be showcasing some of the newest DoCrafts products available as I am incorporating this idea into a sample project for taking along to my demonstrations.

Ok so onto the calendar itself, here is the front cover:

This is again using products from the London themed Portobello Road collection.

Here I've used the gorgeous deep blue crown print paper for my background, the flag embossing folder as a mount for the typography stamp numbers stamped onto Portobello Road papers, a stamp featuring the queens head as well as ribbons, a bow and buttons.

...and this is the page for January:


This is using a backing paper and topper from the new Hot Diggity Dog collection. The ribbons are from the Tatty Ted Winter Wonderland range and I had to include them because the print is perfect for those new year fireworks!

All I've done is take apart one of the very inexpensive DC calendar books and then used a spreadsheet programme to make the dated information box ready to fill in with my demo dates and birthdays, simple!

Thanks for stopping by, Ni. :) x

Thursday, 5 January 2012

Happy New Year!

... well I'm only a few days late! :)

Now for those who are observant you will have seen (on my sidebar) that Saturday is my first Docrafts demo of 2012, hurrah! So for the past few days I have been busily prepping projects using all the new collections.

I have also made one new years resolution, I plan to do at least one blog post per week. I want to keep up to date with sharing my demo cards and the mini tutorials I'm taking to the demo's with me too.

For my first share of 2012 I have produced a scrapbook page using the GORGEOUS new Portobello Road products and the xcut scalloped bunting dies..


The mini photos are a first for me, they came from one of those in-store instant photo printers where I selected 4 images to be on one 6"x4" print. This was a nice way to include some of the photos we took at midnight as well as one of ourselves in the hotel we were staying in.

Right, I'm off to start making some Hot Diggity Dog cards now with the lovely new stamps. Back with more uploads soon! Ni. :) x

Monday, 19 September 2011

It's not just for christmas! - 1 cutting Die, 3 Cards. :)

That's right it isn't, even though it might look like it at first glance!
Today my post is about the versatility of a new Me to You product, the Candy Cane die.
With just a bit of tweaking it becomes such a versatile die and anyone who knows me knows I LOVE die cutting so it's my product of the moment! :)

Ok, so on to the first card!


Now honestly does that look like it was made using Christmas products to you?!
Personally I think the pattern of the embossing folder and papers looks like firework explosions, especially in these colours.

The die is part of the Winter Wonderland range; as are the Snowflurry embossing folder (used on the purple coredinations card) and the white/pink backing paper.The extra bits are the Quickutz Mini Present die, some card candy and the Me to You, Happy Birthday senitment stamp.

***

Now this next card is a christmas card yes, but you'll notice something a bit odd about it.....


That's right, Tatty Ted is no longer his trademark grey colour but a nice chocolate brown!
If you just want to use the die as a non-brand-specific (yes I know thats not a word!) bear then I thought why not make him brown, or maybe even 2-tone with lighter paws and muzzle?!

***

Lastly I thought I should share a card using the die as originally intended, a christmassy Tatty Ted, complete with glittery hat!
The ribbons, senitment and border strip are all from the Winter Wonderland Ultimate pack.


Hope you enjoyed these cards and it was sucessful in displaying the versatility of the die. :)
I'll be back soon with some hints and tips for using the die itself.

Thanks for reading! x