Hello and Welcome!


Welcome to my little place in the blogging world. :)
I like to share details here for the DT projects I create and also some of my own tutorials.
I would love you to leave me a comment so I know that you have visited me.
Thanks for stopping by! Ni :) x
Showing posts with label Docrafts. Show all posts

Tuesday, 5 February 2013

Creativtiy Club DT Tuesday - Love but not love!

Well the original post I had planned for today has completely gone out of the window as I HAD to make a new card to share the fabulous new weekly downloads from the Creativtiy Club with you!

There are 2 collections this week, Love in Pink and Love in Red, featuring heart images and lovely text backing papers as well as more generic patterns and those patterns are what I have used to make this bright funky card today.


I have printed the stripe and zig zag papers from the Love in Pink download and then cut them down into strips and mounted them onto a card blank covered with a burgundy textured card.
The swirls are cut from one of the xcut border die sets, the happy birthday sentiment is from the Bookprint travel stamp set mounted on to one of the dies from the Speech Bubble set and the 40 was a blue cardstock sticker but is now red after being coloured with a zig alcohol marker!

I hope you like this bright card, its is perfect for the bubbly lively recipient and although it is a love download, not a heart in sight!

*****

I can not believe that it has been 6 months already since the first Creativity Club design team was announced for their 6 month term and now it is time for a new team! I have offered to give up my space on the team in order for a new crafter to join and showcase their talents with you; but you are not rid of me yet, as a demonstrator I may be popping up on the Docrafts blog in the near future!
I want to say a big congratulations to all the new recruits who will be sharing their work with you from March. The announcement was made today over on the Docrafts blog so why not pop over and meet them! :D


Sunday, 3 February 2013

Build A Scene dies - no.1 Garden Party

Oops! With a busy weekend and the same sort of start to last week I just could not get time to blog in between work and demo prep and then by the time I did I was falling asleep! I'll be sure to share 2 projects this week to make up for it! :)

Anyway I am here today sharing projects using the new Xcut Build A Scene dies, Garden Party. I have been using these die sets a lot at my demos after many enquiries from customers about how best to use them. Now, remember, although they are called Build A Scene and are obviously designed to build an overall full picture, don't feel restricted by that concept, you can just use selected elements as I have done here.


I have cut the single elements from Kraft card (still addicted to it!) and then on the 'orange' card (inspired from a project by Docrafts very own Jo Austin!) I also used the Artiste orange ink to edge the pieces. I didn't think of this on the 'party' card (I blame being super tired at the time!) which is a shame as that tiny bit of ink really does add dimension.

The party card also uses an element from the Nautical set, no boats there I hear you say?! Although if you look at the edge of the shelf/table the crockery is sitting on, yes that's it, a scalloped edge border. Its the 'wave' strip but instead of keeping the wave edge I kept the 'waste' cut and got a cute scalloped border, this die is now saying permanently in my kit, love it!

The bunting on both cards is from the Garden Party set but again instead of using the full shape I have cut it into smaller pieces. Instead of using solid coloured card why not try a patterned paper or paper piece them by snipping the individual flags from multiple solid and patterned papers, the combinations are endless, its another permanent addition to my die folder!


The paper, buttons and twine are from another new range, Spots And Stripes Capsule collection, a gorgeous range that is perfect as an every occasion stand by. Great pastel tones and generic spot or stripe patterns means this can team up with any stamped images, toppers or decoupage coloured in similar tones, and would work for birthday, thank you, get well, even love themed cards.

Here is another project using individual elements of the the dies along with the 12" double sided Designstax card from the Capsule Collection: 


How cute it that! It is called a Tea Bag & Cookie Holder, there is a pocket on each side of the holder and in the middle you suspend a cellophane bag containing a gift. I have made a mini note card for this example but on another version I have used a decorated tag to add my message. Instead of a tea bag why not add a store gift card to the reverse pocket, or a Lemsip if someone is ill. You can use the central bag for small edible items, jewellery or what about a crafty gift of die cuts, bows, small lengths of ribbon, buttons and brads? That would be sure to put a smile on anyones face!

Now I take no credit whatsoever for the creation of this project, I found the instructions whilst looking for projects to utilise double sided papers. The original idea was created by Debi Pippin and here is her blog post containing lots of samples and a video. Also Chiaki Haverstick has made a PDF tutorial using Debi's measurements which makes it really easy to understand, a huge thanks to both of these ladies for their work and for sharing it. :D

Well versatility definitely seems to be the theme of today's post! Keep looking at your crafty stash in many different ways to get as much use from it as you can! I'll be back on Tuesday (promise!) with more Creativtiy Club DT creations and again at the weekend to share projects using another Build A Scene set.

Saturday, 19 January 2013

Blog Candy Winner! & Chronology Clock


Morning all! I said I would reveal the winner of the Docrafts Creativity Club membership today and so here I am!
I assigned each commenter a number so that even if you had posted multiple times everyone got an equal chance. Then I used an online random number generator to select the winning number for me so without further ado the winner is, 
no 6..... Jewelsmae with her comment "Congratulations on the new position. What a lovely professional looking card, not colours I would have thought of putting together but it really works"
Congratulations! Please get in touch with me at hyperni7(at)gmail(dot)com and I will pass your details on to Emma to arrange your membership. :)

I haven't forgotten my promise to share some projects using the new dies too but currently there are a few in varying stages of progress so you will have to bare with me for a little bit longer, back soon! X

--------------------

Aaargghh! A big thanks to Claire at my demo who told me the above scheduled post had not posted!
Sorry to keep you all waiting even longer for the reveal, so I have now edited my message for today into the above post to add my apology and as a little bonus am adding in a photo of my new project from this week...

It's another one of my upcycling projects!
This was an old silver clock that was being thrown away *horror!* by my mum so I saved it and took it to my craft room. I have been looking into making a crafty clock for ages but never found the time to shop around for the mechanism and with the release of the new Docrafts Chronology collection now was the perfect time to use it!

I covered the clock in the gorgeous orange clock paper using red DST and inked all the edges with orange dye based ink.
For the face I roughly cut the front paper piece to size, laid it over the clock face up and then using a fine metal embossing tool I made dents along the lines of the edge of the clear panel. Then I turned the paper over and cut along these lines using my craft knife and a metal ruler.
The decorative clock hands, clock face and brads are all metal embellishments also from the new range and the black cogs were cut from textured card using the new 9pc chronology cogs die.

The clock will now live on my windowsill and brighten up my craftroom with its funky orange colour. Right as it is still snowy outside I am not venturing anywhere today and am off to the craft room to make some DT cards using my new Xmas present printer (finally!) and the Creativity Club exclusive  downloads. :)

Tuesday, 1 January 2013

Exciting 'news' and Blog Candy!

Blog Candy Post - Please scroll down for newer posts. Thanks.

Evening everyone, I'm back today to finally, officially, share some news. You may have noticed a new blinkie here on my sidebar, a picture on the Docrafts blog or even the announcement of the new Docrafts Creativity Club Design Team and I am thrilled to say I am a DT member!!!
The Creativity Club is a members only club with a huge list of benefits including the exclusive DT projects me and my fellow team mates have been busy creating already!
We will also all be sharing projects on our blogs using the download collections and daily sketches to give non club members a taste of what's available if you sign up as a member and so here is my first DT share, a Thank You card.

This card uses papers from the Retro Prints and You & Me downloads. 
Also from Docrafts are the typography thank you stamp, xcut scalloped rectangle nesting dies and dotted gold ribbon.

*****

Now, to the second part of my post. Emma Collins, Creativity Club manager has kindly offered prizes of a 6 month Creativity Club membership for all of us DT members to share as blog candy giveaways! :)
To be in with a chance of winning this fabulous membership candy all you have to do is become a follower of my blog and leave a comment on this post.

Right a big Good Luck to everyone and I hope to 'see' a few new faces around here very soon. :) Ni. x 

Wednesday, 14 November 2012

Quick Thank You Notes

Evening bloggers. :)
Tonight I am doing a quick share of some thank you cards that I have made to send to family/friends for my birthday gifts.


These simple little notelets are 4" square and made in a pearlescent cream cardstock.
First i stamped the Craftwork cards sentiment in black stazon and then used the Swiss dots embossing  folder all over the front of the card.
The flowers are all Papermania big bloomers from various ranges and the centres are an xcut snowflake punch which handily doubles as flower stamen! I used card candy in the middles of the punched shapes in coordinating colours. Perfect, cute but simple and easily replicated.

Thanks for stopping by today and once again don't forget my blog candy to win a 6 month membership to the Docrafts Creativity Club, tell your friends! :)

Wednesday, 10 October 2012

Creativity Club DT share - Home for Christmas.

Morning bloggers, it's Wednesday so that means I am back with a new DT card for the Docrafts, Creativity Club.

This week my card uses one of the recent downloads, You & Me, which comes in 4 parts and the paper I have used for this project was in part 1.
The You & Me collection is really pretty in soft pastels with floral and bird images but I want to remind you to look at the pages individually and that you can use them in different ways and so my card today is Christmas related!


The green backing paper is the one from the Me & You download, not a flower or bird in sight so perfect for matching with other images but don't think of it as just 'plain' as there is a line/dot pattern on the paper.

The other backing paper is from the recently released Home for Christmas range as is the die cut shape and the matching patterned stamp. The sentiment is one that I cut (gasp!) out of one of the Christmas Tidings urban 4" square stamps as I really liked the fonts on it. The baubles are from the same range and have been stamped on to white card and cut out, strips of acetate have been attached to the back of the green paper and the baubles stuck to the other end so that they actually hang on the front of the card. I have covered the acetate strip with silver border peel offs.

I hope you like this card and if you are a club member already then I hope it makes you look at the huge collection of downloads in a different way! If you are not a member then don't forget that I am running my blog candy with a 6 month Creativity Club membership as the prize!

Thanks for stopping by today. I am off to a distress inks workshop as a student instead of demonstrating for a change, can't wait to learn some new skills and get inky, fun! :D

Wednesday, 3 October 2012

Creativity Club DT share - Tulip Christmas

Afternoon all, a very much later than planned post from me today but I had a friend come round to start planning a London birthday trip - sight seeing, shopping and a show, whoopee!!


Anyway..... todays card uses the new Tulip Christmas collection and is an image from one of the A4 decoupage packs (4 sheets of decoupage and 4 sheets of papers for £3, great value!) which make 8 decoupage images per pack and contain duo papers, two patterns with a border strip accross the middle to cut up as you wish.

Now my card doesnt use paper from the pack but rather a fab stripey one from the Love Christmas, Creativity Club download andmy  layout inspiration came from todays daily sketch no.94.


The flower embellishment was made using the gorgeous new Home For Christmas paper & Bloom, xcut nesting dies and was inspired by the tutorial from Jo Austin on Creativtiy TV recently. Thanks Jo! :)
Aslo used, xcut scallop broder punch, red shimmer dome stickers and Anitas sentiment ribbon.

*** I hope you like this card, dont forget to leave a comment on the original post at the top of the page, and also here to have two chances to win my fab Creativity Club 6 month menbership blog candy. Ni. x ***

Sunday, 23 September 2012

Easy Swing Card - Photo Tutorial

Good morning everyone, well finally I have made it back here to post my tutorial for the style of Swing Card (aka. Flip Card) that I shared in my previous post.

After showing this technique to a large number of crafters at my Docrafts demonstrations over recent months it was decided that my traditional style of demo freebie written tutorial sheets would be much too complicated for this technique and so a photo tutorial with notes has been created.
Bare with me, I hope it makes sense, please let me know if you think any changes need to be made and I'll update as requested. :)


Remember, I have used my parenthesis rectangle no.2 dies from xcut but you can use any symmetrical shape that has an easily identifiable centre (I will do a quick post this week showing how to easily use a circle too!). These measurements make a 5 1/4" card.

Ok so without further ado here is the tutorial in 10 very easy steps.....
*******
1. -  First take a sheet of card that measures 7 1/4" by 5 1/4".
2. - Work with the card horizontally and score at 2 3/4" and 3 3/4"

*******
3. - Next take you chosen die and place it on top of the card, lining up the centre of the die with the
2 3/4" score line.
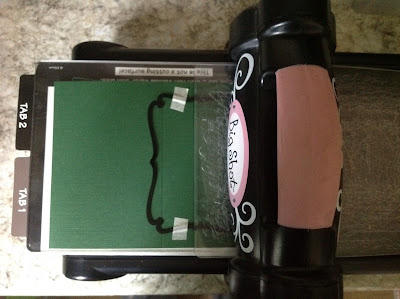
4. - Tape the die into place with low tack tape (stick onto clothes if necessary to de-sticky it a little so it will not rip your card when removed). Place the tape over the small middle panel as shown below, this is a good visual reminder of where not to cut or you will ruin the swing mechanism!


*******
5. - Place the card on the base plate of your chosen die cutting machine and feed the top plate through and line it up with the 3 3/4" score line as shown below. Remember, don't cover the tape! Roll through your machine.
By making your sandwich is this staggered way, when you roll it through your machine you will only cut where the sandwich is complete, so in this case the small area on the right side of the score line.


*******
6. - Once out of the machine, turn your card round 180 degrees and make up a new staggered sandwich to cut the other side of the die, as again shown in the photo below. Remember, don't cover the tape! Roll through your machine.
7. - Once cut, remove the die and lay the card horizonally as before.


*******
8. - Now fold the left side of your card over towards the right edge, creasing at the 3 3/4" score line.
9. - Then fold the same side back to your left creasing on the 2 3/4" score line to give you a finished card blank that will stand like this.....


*******
10. - Decorate as required!
Remember that because you used a die to cut the shaped swing panel you can use the same die for a perfect decorative layer as on the front of my card using the tartan paper, AND you can use the smaller shapes with plain card to create a space to write your message to the recipient.


*******

Right, phew! That's it, tutorial done! Now over to you to see what you think of it!
Thanks for stoping by today, I hope it has been a useful visit and I welcome any comments. Ni. :) x

Tuesday, 28 August 2012

Docrafts A-Z Challenge, letter T.

Evening everyone, I am sharing a quick card today that I have made for a family member and its the dreaded male card!
Luckily most of my family are catered for now using the super Wellington range from Docrafts as it shows Wellington the bear with many sports and leisure activities, perfect.

This card is for the Docrafts A-Z challenge which is over on their blog. The letter this time is T and the products to be used are tags and twine.

I have used some brown/white twine from my stash and my tag is one of the decorative stamps from the new Docrafts, Home for Christmas range in the Tags set.
The stamp comes with 3 lines in the centre for you to hand write a message or leave blank as an embellishment but I have horrified ladies at my recent demos by cutting my stamps up and so I have removed those lines from my stamp with a craft knife and used a Just Rite sentiment stamp to fill the gap, luckily it's a really good fit! :)
Right, I'm off to do some stamping ready for demo prep with new Docrafts products next weekend! Ni. X


Wednesday, 25 July 2012

Easel Drawer Box Card - Tutorial

** WARNING! Photo heavy post!**

Well after another long break from blogging I am finally back to share my most recent demonstration tutorial for Easel Drawer Box Cards, or whatever you like to call them!
I had seen a few of these around last year and I made one at Christmas to hold 3" notelets but had not made a tutorial sheet for it, so my craft buddy Joanne and I set to work!

We have made 2 sizes of these projects with different suggested uses.
*The smaller one finishes up at 3" square and will stand up to look like a regular card when the drawer is closed. It is perfect for a small piece of jewellery or a few individually wrapped chocolates as a little gift.

This one was simply decorated using the Wellington range from Docrafts...


*The larger one finishes up at 3 1/2" square which as I mentioned before is perfect for 3" notelets like the ones below that I have decorated using the Lucy Cromwell collection from Docrafts...


And here are my versions using the Enchanted Fairies and Bexley Black ranges.


 ...and finally, here are the size guides. They really are very simple to put together but just remember to use a good weight of card to give it some stability.


Thanks for stopping by, hope I haven't bored you with so many photos! Ni. x


Tuesday, 10 April 2012

The end of the Loop!

Wow time has gone so quickly again that I have now completed all my demo's for the current loop of Docrafts products. Tomorrow will be spent unpacking my bags, having a final play with some of the items and then adding it all into my stash ready for the next kit to arrive in a few weeks. :)

Here are a few cards from the demo on Saturday that I wanted to share, which use the recently released Enchanted Fairies range of products:

This first card uses the tutorial from my previous post for the Box Pop-Up cards and some zingy green card with a fairy topper, papers and sentiment.

This is a mini 4" square stepper card using the die cut frames sheet from the Goody Bag as well as the papers and sentiments.

Lastly is the project which was the 'hit' of the day! This is a mini Easel Box Card which I have made specificaly to fit the mini notelets and envelopes from Papermania.

I used a lot more layers and embellishments on this project than is usual for me and I'm really pleased with how it came out. The store loved it so much that I let them keep the sample and promised the customers I will write up a tutorial to take with me for my next demo in June!


All the rest of my samples from this loop, (over 30 in total!) including the Boofle & Michael Powell ranges can be viewed by clicking the link to my Docrafts designer gallery on the right sidebar, thank you to everyone who have left lovely comments already.
Back soon! Ni. x

Wednesday, 1 February 2012

Get Funky! Challenge - January Blues

Morning everyone!
I know my life has changed quite a lot since I became a DoCrafts demonstrator as there is a lot of prep work to do, admin after the demos, packing and unpacking and tidying my kit in between, as well as remaking some samples I leave in behind each time and of course the travelling to different stores; (now don't get me wrong here, I'm LOVING every minute of it and enjoy being busy!) but because of this I know I have not had much time to wander blog land or enter challenges. I didn't realise just how busy I'd been though until I noticed that I hadn't taken part in a Get Funky challenge since July!
So my post today is changing that and hopefully I'll be forgiven for going awol for a few months! :)

I needed to make a card for a new male colleague who turned 21 yesterday and the theme of January Blues  just seemed the perfect colour choice so here is my card (sorry the pic quality is not great!).


I have used two wordbook pages from the Blue Magic section on the Dreams Come True cd to make myself a simple base card. They were joined together with DST and the back page was then scored 1cm from the edge so that the front of the card is not marked by a fold line.
I love spots and dots on papers and the fact that this pattern was in reversed colour ways was brilliant for creating contrast between my pages but keeping the theme together, clever planning during the cd design me thinks!
The sentiment is a DoCrafts one stamped with a versafine ink, coloured with Promarkers and Zig Kurecolor pens. The name is white pearlescent card candy that I coloured to match the sentiment and the letters were drawn on with a fine liner pen. I used labels 8 to cut the sentiment shape and the same fine liner pen to edge the shape and faux stitch the numbers.

So that's it, a very simple card but hopefully it was well received, we'll see after he comes back to work!
I'm off to browse the DT cards now and the other entries for the challenge. Ni. xx

Saturday, 21 January 2012

Sweet / Candle Gift Box Card - Tutorial.

Good afternoon!
Yes, that's right I am actually back for my second post of this week, ok ok, don't fall off your chair in shock lol! ;)
I have been busily uploading some of my DoCrafts demonstration samples and as I am about to upload some examples of the currently popular Gift Box Card I wanted to upload my own set of instructions and a diagram for making them.
You can also see my finished samples further down the post.


So as you can see it really is a very simple process, just 6 simple score lines and then a couple of cuts and there you have it!
If anyone is in the Ipswich area then I will be demoing these cards on Sat 28th at The Range and Sat Feb 11th at Bypass Nurseries if you would like to see a practical tutorial too. :)

Ok so on to my samples, this first one is my original attempt at this technique and has been made into a Thank You card with chocolates inside and features the Hot Diggity Dog range of products.


My second sample uses the adapted instructions for tea light candles and uses the Moments of Faith range...


... and this last picture shows that you do not have to add an aperture and uses one of my favourite products, the Tatty Ted layered die.


I hope this tutorial is of use to anyone who stops by and sees it, I would love to see any cards made using the instructions. Don't forget to check both of my DoCrafts galleries for updates using the new products all this month and in February too. Ni. :) x

Tuesday, 17 January 2012

2012 Calendar Series - Cover & January.

Ok so I've failed already at wanting to post at least once a week but hopefully that will change soon as I am looking to get a new smartphone so I can blog direct from that, much more convenient! :)

***

Today I'm sharing a project that will be the first in a series of posts all coming together to make a complete desk calendar for 2012.

I'm hoping that making the page at the start of each month will get me thinking about which cards I need to get made in that month so I can get them ready on time and wont forget anyone, well that's the plan anyway!

Each page/month will be showcasing some of the newest DoCrafts products available as I am incorporating this idea into a sample project for taking along to my demonstrations.

Ok so onto the calendar itself, here is the front cover:

This is again using products from the London themed Portobello Road collection.

Here I've used the gorgeous deep blue crown print paper for my background, the flag embossing folder as a mount for the typography stamp numbers stamped onto Portobello Road papers, a stamp featuring the queens head as well as ribbons, a bow and buttons.

...and this is the page for January:


This is using a backing paper and topper from the new Hot Diggity Dog collection. The ribbons are from the Tatty Ted Winter Wonderland range and I had to include them because the print is perfect for those new year fireworks!

All I've done is take apart one of the very inexpensive DC calendar books and then used a spreadsheet programme to make the dated information box ready to fill in with my demo dates and birthdays, simple!

Thanks for stopping by, Ni. :) x

Monday, 19 September 2011

It's not just for christmas! - 1 cutting Die, 3 Cards. :)

That's right it isn't, even though it might look like it at first glance!
Today my post is about the versatility of a new Me to You product, the Candy Cane die.
With just a bit of tweaking it becomes such a versatile die and anyone who knows me knows I LOVE die cutting so it's my product of the moment! :)

Ok, so on to the first card!


Now honestly does that look like it was made using Christmas products to you?!
Personally I think the pattern of the embossing folder and papers looks like firework explosions, especially in these colours.

The die is part of the Winter Wonderland range; as are the Snowflurry embossing folder (used on the purple coredinations card) and the white/pink backing paper.The extra bits are the Quickutz Mini Present die, some card candy and the Me to You, Happy Birthday senitment stamp.

***

Now this next card is a christmas card yes, but you'll notice something a bit odd about it.....


That's right, Tatty Ted is no longer his trademark grey colour but a nice chocolate brown!
If you just want to use the die as a non-brand-specific (yes I know thats not a word!) bear then I thought why not make him brown, or maybe even 2-tone with lighter paws and muzzle?!

***

Lastly I thought I should share a card using the die as originally intended, a christmassy Tatty Ted, complete with glittery hat!
The ribbons, senitment and border strip are all from the Winter Wonderland Ultimate pack.


Hope you enjoyed these cards and it was sucessful in displaying the versatility of the die. :)
I'll be back soon with some hints and tips for using the die itself.

Thanks for reading! x

Sunday, 4 September 2011

The Day After Demo #1! One sheet Hinged Box - Tutorial

Well, what can I say?!
Such a FABLOUS day!!!!! :)

I left early (remembering this time to eat breakfast to keep my strength up lol!) and arrived in good time to settle myself in.
Terri the owner of The Craft Den was very welcoming and offered me a tea/coffee before the shop opened whilst we were arranged where to put the samples. :)

I think overall that the demo went well, there were lots of people in the shop and I had some very friendly ladies sit for a while to watch me demo the samples and some techniques (and have a craft related chat!) throughout the whole day.
Everyone was so lovely and couldnt have made me feel more welcome and I even had to be reminded that I needed to stop for lunch, especially when the very talented Sue turned up with a GORGEOUS chocolate cake! Yum! :)

Anyway, the point of this post is that I promised to share the measurements for one of the favourite samples of the day, a one sheet of card Hinged Box (aka a Pizza Box).


 A very simple box (even if my diagram doesn't show it!) but there were so many suggestions of different uses for them and ideas for adjusting the size to fit specific items and that along with the fact they are so simple to produce (very quickly!) makes them a big hit!

EDITED TO ADD : Oops! Forgot to mention about the covers.
You can make these using nesties or just rectangles of card slightly larger than your finished box and cut the edges with decorative scissors etc.

Enjoy! Ni. x :)

Wednesday, 13 July 2011

Get Funky! Challenge - Anice's Sketch Challenge

Here is my slightly last minute entry for the latest challenge over at the Get Funky! blog.
Another hectic few weeks here, [hopefully with some news to follow very soon ;) ] so having a sketch challenge was perfect. I find my cards come together so much quicker with sketches to follow.


I'll say this quietly but I've actually made an Xmas card this month *shields herself from the evil looks*.
I know, I know xmas in July is mad but I had some yummy new papers and stamps to play with! :)


The stamps were the new freebie from Papercraft Essentials Magazine which was a fab set of Our Betty images! Yay, more for my collection, thanks lots for the exclusive design!

As soon as I saw it I thought Betty's dress would work fab in 2 tone and decided on traditional xmas red and green to match with.....
My new papers from the Forever Friends Retro collection by DoCrafts. Also by DC are the card blank and new 'Noel' range ribbon and bow. The mini present die is by Quickutz.
Instead of adding another layer of backing paper I used a black fineliner pen to do some faux stitching, which considering I dont use it much has turned out quite well IMHO!


Thanks for stopping by, hope this card is ok for the challenge. Ni  :) x

Thursday, 30 June 2011

Tatty Ted Challenge Card

Well I am truly a terrible blogger! Over a month since my last post, shows I have sadly not been crafting as much recently, think it's partly the lovely weather to be honest and I have been playing with my cricut and SCAL rather a lot!!

Today I'm sharing my card for the Tatty Ted Challenge I've been hosting over on DC, the sketch is:


The only criteria was that I wanted to use the black frame in the sketch as an actual frame rather than just normal matting/layering. So here is my own card:


The background flowers are using a Tapestry Peg stamp inked in black.

The paper is a 12x12 gorgeous Doodlebug one that I got in a sale for 20p!


The TT image has been recycled from the packaging of my TT peel-off's. :)


The frame is the new xcut NESTNG DIES!!!! Woo! Been waiting ages for these and have to say I'm really impressed with them, lovely designs and a fab price too! This is the parenthesis design.


The little sentiment was a freebie from a DC creativity magazine, I just cut off the borders!


Embellishments from DC, butterfly was a DC punch.

Thanks for stopping by. Ni :) x

Sunday, 22 May 2011

Get Funky! Challenge - Master Chef Recipe

After missing last months challenge at Get Funky! due to the madness here (job interviews, job applications, my illness bug and BF's eye injury!) I have made sure to make my card for this month's challenge in good time! :)

Kathy has set the Master Chef Recipe challenge, which is as follows:
3 different papers, 5 flowers, 2 buttons, 1 length of ribbon & pearls/gems to season.
You must also use the usual 1 Funky Hand product.

Here is my card:


I have used my new (first but surely not last!) Our Betty stamp set. I love this 'Your Special Day' set which is so versatile as it comes with a variety of objects for Betty to hold (and you could add different ones too!) so look out for these in use again very soon!

Here is how I met the recipe:
3 different papers - white for stamping onto, double sided pale pink/pink floral patterned paper, hot pink card.
5 flowers - DC punched from the d/s paper.
2 buttons - bought specially on an emergency trip to a local craft store as I had no pink buttons!
1 length of ribbon - DC adhesive ric rac
Pearls/gems to season - again from DC, mini gem wheel gems as flower centers.

Betty's dress was stamped onto the hot pink card and paper pieced onto the stamped image, skin/hair coloured with promarkers. Also used one of the sentiments from the set too.
Ovals made with my very neglected (for nesties/cricut) xcut shape cutter system, which works much better on a glass mat, wish I'd known this years ago!

Thanks for stopping by, Ni x :)

Thursday, 19 May 2011

Tatty Ted Sketch Challenge Card :)

Wow almost a month since my last post, I am a bad blogger, well I have very good intentions but as some DC challengers may already know there has been a lot going on here recently. Anyways enough of the boring stuff, on to a card! Yay!


This is my card for the challenge I am hosting on the DC forums which follows a sketch.

I made it using the new freebie stamp from the latest DC magazine, Tatty Teddy!
I'm so pleased DC have purchased the license for these products as this little grey bear is so cute!

I saw this method with a split patterned backing paper and ribbon strip used on a card somewhere ages ago and wanted to try it for myself. :)
The paper is by Buzzcraft which I bought in a pack from the recent Sincerely Yours papercraft show.

I stamped Tatty Ted with black versafine ink and coloured it with my waterbrush using the Soft Grey Fur ink. Then I used my craft knife to cut slit in his paw to allow him to 'hold' the mini flag I made using a cocktail stick, some pearlescent card and a star brad - simple!

I thought this was a nice different way of using the stamp instead of just as a basic image and there is scope for other items to be used in this way. Thanks for stopping by, Ni :) x