Evening Bloggers, it's cold, windy and rainy here in Norwich this evening (although luckily no snow as yet!) so to cheer myself up I am hiding away in my craft room making my final christmas cards for this year and starting on a few present tags. :)
To any followers from Docrafts I just wanted to let you know I have added their newly designed 'button' to my page which will link you to the Creativity Club's own special blog where you can find an A-Z challenge and some behind the scenes sneak peeks of new products as well as exclusive Club member offers!
Lastly, I have added another demo date to my blog, this one is the 11th February at Bypass Nurseries in Ipswich, another new shop for me to visit. Really looking forward to getting the new kit and prepping all my samples to share with everyone!
Right off to the craft desk I go! :) x
Friday, 16 December 2011
Sunday, 4 December 2011
January 2012 - Demonstration Dates
I am such a bad blogger, it's been ages again since I posted but having had a break for this loop with Docrafts I have no new samples to show you, however I do have some news, my January 2012 demo dates are confirmed, woo!
You will find the dates for these on the right sidebar, that's over there! >>>
I shall be going to Home Grown Crafts for the first time on the 7th January, its very exciting to be going to a store that is new to me and it also means im sure I will be spending lots of pennies after my demo too! :)
The other 2 weeks I will be at The Range, firstly in Norwich on the 14th and then in Ipswich on the 28th.
I really hope that I get to meet some docrafts forum members or bloggers on my travels, please make sure to introduce yourself if you do stop by! Ni. xx
Monday, 19 September 2011
It's not just for christmas! - 1 cutting Die, 3 Cards. :)
That's right it isn't, even though it might look like it at first glance!
Today my post is about the versatility of a new Me to You product, the Candy Cane die.
With just a bit of tweaking it becomes such a versatile die and anyone who knows me knows I LOVE die cutting so it's my product of the moment! :)
Ok, so on to the first card!

Now honestly does that look like it was made using Christmas products to you?!
Personally I think the pattern of the embossing folder and papers looks like firework explosions, especially in these colours.
The die is part of the Winter Wonderland range; as are the Snowflurry embossing folder (used on the purple coredinations card) and the white/pink backing paper.The extra bits are the Quickutz Mini Present die, some card candy and the Me to You, Happy Birthday senitment stamp.
***
Now this next card is a christmas card yes, but you'll notice something a bit odd about it.....

That's right, Tatty Ted is no longer his trademark grey colour but a nice chocolate brown!
If you just want to use the die as a non-brand-specific (yes I know thats not a word!) bear then I thought why not make him brown, or maybe even 2-tone with lighter paws and muzzle?!
***
Lastly I thought I should share a card using the die as originally intended, a christmassy Tatty Ted, complete with glittery hat!
The ribbons, senitment and border strip are all from the Winter Wonderland Ultimate pack.

Hope you enjoyed these cards and it was sucessful in displaying the versatility of the die. :)
I'll be back soon with some hints and tips for using the die itself.Thanks for reading! x
Sunday, 4 September 2011
The Day After Demo #1! One sheet Hinged Box - Tutorial
Well, what can I say?!
Such a FABLOUS day!!!!! :)
I think overall that the demo went well, there were lots of people in the shop and I had some very friendly ladies sit for a while to watch me demo the samples and some techniques (and have a craft related chat!) throughout the whole day.
Everyone was so lovely and couldnt have made me feel more welcome and I even had to be reminded that I needed to stop for lunch, especially when the very talented Sue turned up with a GORGEOUS chocolate cake! Yum! :)
Anyway, the point of this post is that I promised to share the measurements for one of the favourite samples of the day, a one sheet of card Hinged Box (aka a Pizza Box).


Such a FABLOUS day!!!!! :)
I left early (remembering this time to eat breakfast to keep my strength up lol!) and arrived in good time to settle myself in.
Terri the owner of The Craft Den was very welcoming and offered me a tea/coffee before the shop opened whilst we were arranged where to put the samples. :)
I think overall that the demo went well, there were lots of people in the shop and I had some very friendly ladies sit for a while to watch me demo the samples and some techniques (and have a craft related chat!) throughout the whole day.
Everyone was so lovely and couldnt have made me feel more welcome and I even had to be reminded that I needed to stop for lunch, especially when the very talented Sue turned up with a GORGEOUS chocolate cake! Yum! :)
Anyway, the point of this post is that I promised to share the measurements for one of the favourite samples of the day, a one sheet of card Hinged Box (aka a Pizza Box).


A very simple box (even if my diagram doesn't show it!) but there were so many suggestions of different uses for them and ideas for adjusting the size to fit specific items and that along with the fact they are so simple to produce (very quickly!) makes them a big hit!
EDITED TO ADD : Oops! Forgot to mention about the covers.
You can make these using nesties or just rectangles of card slightly larger than your finished box and cut the edges with decorative scissors etc.
EDITED TO ADD : Oops! Forgot to mention about the covers.
You can make these using nesties or just rectangles of card slightly larger than your finished box and cut the edges with decorative scissors etc.
Enjoy! Ni. x :)
Wednesday, 31 August 2011
A CRAFT ROOM - At last!
.....Well strictly it's half a room but give me some time and I'll take it all over!!!
*insert evil laugh here!*
Good morning all!
With the fab news of me becoming a Docrafts demonstrator and my ever growing stash I have been allowed to remove the bed from one spare room and my fab and very handy Dad has put me up a workspace with the promise some shelves to follow!! :)
This first pic is before the bed was dismantled but shows my new work top, an off cut from when the kitchen was updated! See I'm being thrifty too, that way I have more pennies for new stash, lol!

 In case anyone is interested the square units are from Argos, they were a buy 2 get 1 free offer and then I added the small bookcase from the same range.
Lastly pic 3, taken Monday during my 1st demo prep session!
I had gone to get some lunch about 3pm after working from 11am and when I came back I looked into the room and thought it looked like a whirlwind (albeit a quite tidy one!) had stopped by, lol!
 Hope you have enjoyed your lil sneaky peek into my new craft space, I am so lucky to finally have an area to call mine instead of crafting on the floor for everyone to trip over!
I'll be back with more photos once I add new storage and work out where everything is going to live! :)
Thanks for stopping by, Ni. :) x
*insert evil laugh here!*
Good morning all!
With the fab news of me becoming a Docrafts demonstrator and my ever growing stash I have been allowed to remove the bed from one spare room and my fab and very handy Dad has put me up a workspace with the promise some shelves to follow!! :)
This first pic is before the bed was dismantled but shows my new work top, an off cut from when the kitchen was updated! See I'm being thrifty too, that way I have more pennies for new stash, lol!

Next is the pic of when I quickly and very roughly 'moved in' and was trying to find a home for some bits and pieces.

Lastly pic 3, taken Monday during my 1st demo prep session!
I had gone to get some lunch about 3pm after working from 11am and when I came back I looked into the room and thought it looked like a whirlwind (albeit a quite tidy one!) had stopped by, lol!

I'll be back with more photos once I add new storage and work out where everything is going to live! :)
Thanks for stopping by, Ni. :) x
Monday, 8 August 2011
Spellbinders Nestabilities - Basics & Beyond.
YAY! It's finally here! Now for a quick flick through and, as promised, my mini 'book review'. :)

There are handy 'Did You know?' boxes on some of the pages throughout the book which contain extra little hints of how best to utilize your dies.
***
As I dont have permission to post any pics etc and dont want to infringe any copyright I have added the links below to the publishers website and some of the DT and/or offical reviewers blog posts which have some pics included. HTH! :)
Publishers website, there are a few pics on here http://www.anniesattic.com/paper_crafts/detail.html?prod_id=83189
There was also a blog tour which can be viewed:
Here - http://thewillowgarden.blogspot.com/2011/02/spellbinders-nestabilities-basics.html
here - http://stopandstamptheroses.blogspot.com/2011/02/spellbinders-nestabilities-basics-and.html
here - http://tamimayberry.blogspot.com/2011/02/spellbinders-nestabilities-basics.html
here - http://valeriestangle.blogspot.com/2011/02/spellbinders-nestabilities-basics.html
here - http://creativepad.typepad.com/creative_pad/2011/02/spellbinders-nestabilities-basics-beyond-blog-tour-.html
and here! http://hopartstudios.typepad.com/hop_art_studios/2011/02/spellbinders-nestabilities-basic-beyond-blog-tour.html
***
Thanks for reading if you've made it this far! Hope this has been of some help to anyone wondering whether to buy the book or not, I'd definitely say, you need to get it lol! Ni. :) x
The Basics & Beyond book lists 45+ projects using the Spellbinders Nestabilites dies which are broken down into four sections that I'll give you a brief overview of shortly...
...BUT the book begins with a Special Techniques section covering the basics of die cutting and embossing, shaped cards, frames and apertures.
There are mini tutorials for using the dies as stencils and for a reverse stenciling technique (Hoping to try this soon and will blog the results!), as well as a pyramage technique, flower making and other mini embellishments.
***
The four main sections are as follows:
Baby projects include;
Cards, Bibs, Invitations, Favours, Mini Album, Keepsake Box.
Birthday projects include;
Cards, Cupcake Pinwheel (trying this out soon too!), Treat Bag, Tag, Candy Wrapper (that's a chocolate bar wrapper if you're in England like me lol!), Gift Box/Bag.
Christmas projects include;
Cards, Gift Box, Decorations, Tag, Decorated Notebook.
Life's Moments projects include;
Cards, Invitation, Place Card, Memory Book, Frame, Decorations, Box, Candle.***
Each project comes with a materials list if you wanted to copy the projects exactly or just wanted to know details of the products used.
On the back page is a list of the featured designers with their blogs addresses and a product stockists list.
***
Overall I am thrilled with the book and personally I think it is well worth the money; there are some gorgeous projects in it to recreate or just to use for inspiration.
I honestly think that if you love your spellbinders dies you wouldn't be disappointed with this book, I'm certainly not!***
As I dont have permission to post any pics etc and dont want to infringe any copyright I have added the links below to the publishers website and some of the DT and/or offical reviewers blog posts which have some pics included. HTH! :)
Publishers website, there are a few pics on here http://www.anniesattic.com/paper_crafts/detail.html?prod_id=83189
There was also a blog tour which can be viewed:
Here - http://thewillowgarden.blogspot.com/2011/02/spellbinders-nestabilities-basics.html
here - http://stopandstamptheroses.blogspot.com/2011/02/spellbinders-nestabilities-basics-and.html
here - http://tamimayberry.blogspot.com/2011/02/spellbinders-nestabilities-basics.html
here - http://valeriestangle.blogspot.com/2011/02/spellbinders-nestabilities-basics.html
here - http://creativepad.typepad.com/creative_pad/2011/02/spellbinders-nestabilities-basics-beyond-blog-tour-.html
and here! http://hopartstudios.typepad.com/hop_art_studios/2011/02/spellbinders-nestabilities-basic-beyond-blog-tour.html
***
Thanks for reading if you've made it this far! Hope this has been of some help to anyone wondering whether to buy the book or not, I'd definitely say, you need to get it lol! Ni. :) x
Thursday, 4 August 2011
Fabulous news - I'm now a Docrafts demonstrator! :)
...well its fabulous news for me anyway lol!
I can finally reveal what has been taking up all my time recently, yes that's right the post title says it all.
I have been asked to become a docrafts demonstrator! YAY!
 I carried out a trial demo with the new July/Aug products a few weeks ago and the prep was definitely a lot of 'work' (although I can't say it was unpleasant!) ;)
It took longer than I realised to work out how to use all the goodies I'd been asked to demo and in the end I made 20 or so projects just for my 3 hour demo!
* All the cards are being added to my DC gallery over the next few days, although I've uploaded a pic here of the full demo table on the day! * I'll also be sure to add a button here in my sidebar to link directly to my demonstrator gallery.*

I will definitely be posting on here a lot more here now as I will be trying to upload all my demo cards along with the products used and the details of how I made them.
Lastly I would like to say a huge Thank You to those few people that knew I'd applied and wished me good luck and also for their congratulations.
Also, to the people that have been over and commented on the new cards already, I'm glad they seem to be ok!
Am now looking forward to my first 'real' demo in September!
Thanks for reading, from a very happy, Ni. :)
I can finally reveal what has been taking up all my time recently, yes that's right the post title says it all.
I have been asked to become a docrafts demonstrator! YAY!
It took longer than I realised to work out how to use all the goodies I'd been asked to demo and in the end I made 20 or so projects just for my 3 hour demo!
* All the cards are being added to my DC gallery over the next few days, although I've uploaded a pic here of the full demo table on the day! * I'll also be sure to add a button here in my sidebar to link directly to my demonstrator gallery.*

I will definitely be posting on here a lot more here now as I will be trying to upload all my demo cards along with the products used and the details of how I made them.
Lastly I would like to say a huge Thank You to those few people that knew I'd applied and wished me good luck and also for their congratulations.
Also, to the people that have been over and commented on the new cards already, I'm glad they seem to be ok!
Am now looking forward to my first 'real' demo in September!
Thanks for reading, from a very happy, Ni. :)
Wednesday, 13 July 2011
Get Funky! Challenge - Anice's Sketch Challenge
Here is my slightly last minute entry for the latest challenge over at the Get Funky! blog.
Another hectic few weeks here, [hopefully with some news to follow very soon ;) ] so having a sketch challenge was perfect. I find my cards come together so much quicker with sketches to follow.
![]()
I'll say this quietly but I've actually made an Xmas card this month *shields herself from the evil looks*.
I know, I know xmas in July is mad but I had some yummy new papers and stamps to play with! :)
![]()
The stamps were the new freebie from Papercraft Essentials Magazine which was a fab set of Our Betty images! Yay, more for my collection, thanks lots for the exclusive design!
As soon as I saw it I thought Betty's dress would work fab in 2 tone and decided on traditional xmas red and green to match with.....
My new papers from the Forever Friends Retro collection by DoCrafts. Also by DC are the card blank and new 'Noel' range ribbon and bow. The mini present die is by Quickutz.
Instead of adding another layer of backing paper I used a black fineliner pen to do some faux stitching, which considering I dont use it much has turned out quite well IMHO!
Thanks for stopping by, hope this card is ok for the challenge. Ni :) x
Another hectic few weeks here, [hopefully with some news to follow very soon ;) ] so having a sketch challenge was perfect. I find my cards come together so much quicker with sketches to follow.

I'll say this quietly but I've actually made an Xmas card this month *shields herself from the evil looks*.
I know, I know xmas in July is mad but I had some yummy new papers and stamps to play with! :)

The stamps were the new freebie from Papercraft Essentials Magazine which was a fab set of Our Betty images! Yay, more for my collection, thanks lots for the exclusive design!
As soon as I saw it I thought Betty's dress would work fab in 2 tone and decided on traditional xmas red and green to match with.....
My new papers from the Forever Friends Retro collection by DoCrafts. Also by DC are the card blank and new 'Noel' range ribbon and bow. The mini present die is by Quickutz.
Instead of adding another layer of backing paper I used a black fineliner pen to do some faux stitching, which considering I dont use it much has turned out quite well IMHO!
Thanks for stopping by, hope this card is ok for the challenge. Ni :) x
Sunday, 10 July 2011
'Ultimate' Happy Birthday Cards.
Been busily playing with the new Happy Birthday Ultimate Pack and few other bits from the new DoCrafts releases and have made the following:
Firstly using the new typography happy birthday stamp which I coloured, and some of the cardstock stickers also in the collection. I wanted to personalise it and so this will be perfect for my cousins little boy later this month!
![]()
This is an easel card that I've kept monochromatic using the capsule collection sizzling red hot smooth card with the 5 and 0 stamps, another cardstock present sticker and some gems.
![]()
![]()
![]()
Firstly using the new typography happy birthday stamp which I coloured, and some of the cardstock stickers also in the collection. I wanted to personalise it and so this will be perfect for my cousins little boy later this month!

This is an easel card that I've kept monochromatic using the capsule collection sizzling red hot smooth card with the 5 and 0 stamps, another cardstock present sticker and some gems.

Lastly using an idea in the new creativity magazine I made a basic pop up card. Decorated the front using die cut shapes, greeting and paper from the ultimate pack. Also covered the pop up with tag and present die cuts and added a blank shape for writing a message on.


Just a few simple cards but I really like the colours and paper patterns in this new collection and am pleased with these cards. TFL, Ni :) x
Thursday, 30 June 2011
Tatty Ted Challenge Card
Well I am truly a terrible blogger! Over a month since my last post, shows I have sadly not been crafting as much recently, think it's partly the lovely weather to be honest and I have been playing with my cricut and SCAL rather a lot!!
Today I'm sharing my card for the Tatty Ted Challenge I've been hosting over on DC, the sketch is:
![]()
The only criteria was that I wanted to use the black frame in the sketch as an actual frame rather than just normal matting/layering. So here is my own card:
![]()
The background flowers are using a Tapestry Peg stamp inked in black.
The paper is a 12x12 gorgeous Doodlebug one that I got in a sale for 20p!
The TT image has been recycled from the packaging of my TT peel-off's. :)
The frame is the new xcut NESTNG DIES!!!! Woo! Been waiting ages for these and have to say I'm really impressed with them, lovely designs and a fab price too! This is the parenthesis design.
The little sentiment was a freebie from a DC creativity magazine, I just cut off the borders!
Embellishments from DC, butterfly was a DC punch.
Thanks for stopping by. Ni :) x
Today I'm sharing my card for the Tatty Ted Challenge I've been hosting over on DC, the sketch is:

The only criteria was that I wanted to use the black frame in the sketch as an actual frame rather than just normal matting/layering. So here is my own card:

The background flowers are using a Tapestry Peg stamp inked in black.
The paper is a 12x12 gorgeous Doodlebug one that I got in a sale for 20p!
The TT image has been recycled from the packaging of my TT peel-off's. :)
The frame is the new xcut NESTNG DIES!!!! Woo! Been waiting ages for these and have to say I'm really impressed with them, lovely designs and a fab price too! This is the parenthesis design.
The little sentiment was a freebie from a DC creativity magazine, I just cut off the borders!
Embellishments from DC, butterfly was a DC punch.
Thanks for stopping by. Ni :) x
Sunday, 22 May 2011
Get Funky! Challenge - Master Chef Recipe
After missing last months challenge at Get Funky! due to the madness here (job interviews, job applications, my illness bug and BF's eye injury!) I have made sure to make my card for this month's challenge in good time! :)
Kathy has set the Master Chef Recipe challenge, which is as follows:
3 different papers, 5 flowers, 2 buttons, 1 length of ribbon & pearls/gems to season.
You must also use the usual 1 Funky Hand product.
Here is my card:

I have used my new (first but surely not last!) Our Betty stamp set. I love this 'Your Special Day' set which is so versatile as it comes with a variety of objects for Betty to hold (and you could add different ones too!) so look out for these in use again very soon!
Here is how I met the recipe:
3 different papers - white for stamping onto, double sided pale pink/pink floral patterned paper, hot pink card.
5 flowers - DC punched from the d/s paper.
2 buttons - bought specially on an emergency trip to a local craft store as I had no pink buttons!
1 length of ribbon - DC adhesive ric rac
Pearls/gems to season - again from DC, mini gem wheel gems as flower centers.
Betty's dress was stamped onto the hot pink card and paper pieced onto the stamped image, skin/hair coloured with promarkers. Also used one of the sentiments from the set too.
Ovals made with my very neglected (for nesties/cricut) xcut shape cutter system, which works much better on a glass mat, wish I'd known this years ago!
Thanks for stopping by, Ni x :)
Thursday, 19 May 2011
Tatty Ted Sketch Challenge Card :)
Wow almost a month since my last post, I am a bad blogger, well I have very good intentions but as some DC challengers may already know there has been a lot going on here recently. Anyways enough of the boring stuff, on to a card! Yay!


This is my card for the challenge I am hosting on the DC forums which follows a sketch.
I made it using the new freebie stamp from the latest DC magazine, Tatty Teddy!
I'm so pleased DC have purchased the license for these products as this little grey bear is so cute!I saw this method with a split patterned backing paper and ribbon strip used on a card somewhere ages ago and wanted to try it for myself. :)
The paper is by Buzzcraft which I bought in a pack from the recent Sincerely Yours papercraft show.I stamped Tatty Ted with black versafine ink and coloured it with my waterbrush using the Soft Grey Fur ink. Then I used my craft knife to cut slit in his paw to allow him to 'hold' the mini flag I made using a cocktail stick, some pearlescent card and a star brad - simple!
I thought this was a nice different way of using the stamp instead of just as a basic image and there is scope for other items to be used in this way. Thanks for stopping by, Ni :) x
Monday, 25 April 2011
Cupcake Card!
Good afternoon! Hope everyone had a lovely Easter weekend, I have been poorly in the last week so it was only my first day out of bed yesterday for a while. To make up for it today I have set myself and the laptop up in the garden in the sunshine! Yay! :)
***
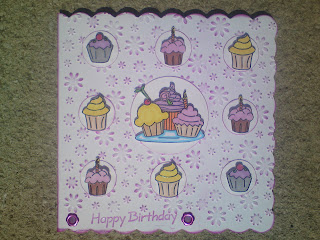
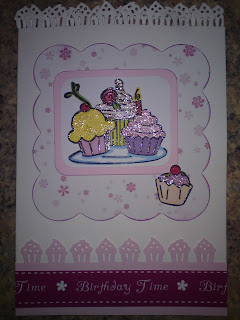
Here is a card I made last night for a friends birthday this month. She is cupcake mad so what could be better than:
***
Here is a card I made last night for a friends birthday this month. She is cupcake mad so what could be better than:

Yum! This was made using the DC freebies from one of the fairly recent magazines, the designs are part of the Little Cake Shoppe range.
As well as the cupcake stamps you also got an A6 daisy embossing folder which is how I embossed my scalloped card blank, then I inked over the top to make a nice patterned background.
The cupcakes were stamped in black ink and clear heat embossed to make them shine and then coloured in with promarkers. Each image was then mounted onto nestie cut circles of white card inked at the edges and mounted onto foam pads.
The sentiment was stamped in the same ink and clear heat embossed and I added 2 daisy eyelets to finish.
Another simple to produce card but I think my friend will love it! TFL! Ni :) x
Tuesday, 19 April 2011
Cricut 'Wild Card' Series #2
Good afternoon!
My card today is the second in my Wild Card series; the 'Bandaid' or Plaster if you're English! :)

My card today is the second in my Wild Card series; the 'Bandaid' or Plaster if you're English! :)

This is of course the perfect 'Get Well Soon' themed card and so I cut the phrase and its shadow from my Paper Lace cartridge and covered it in glitter glue to make it really sparkle!
I had these little flower die cuts in my stash that I layered up for embellies.I added these to the base card that I had cut in the blackout feature and the liner feature is the small 'breathable' padded section in the middle, raised up on foam pads for dimension.
Another simple card but its so effective, when I gave it to my friend she was really impressed and it really stood out amongst the other cards she had been given!
TFL, Ni :) x
Monday, 18 April 2011
Cricut 'Wild Card' Series #1!
Hello! :)
I bought the Wild Card cartridge for my cricut and have hardly used it yet so am setting myself a personal challenge to make one of each card style and blog it!
This is a fab cartridge with almost 40 different shaped designs of card base and the matching envelopes are amazing!
There are the base card and envelope as well as a: frame, phrase, icon, liner and blackout feature on each design and there is even an alphabet too! I love how much stuff you get on cricut carts. :)
My first card has been uploaded to DC as a challenge card so some followers may have seen it already:

This is the owl card! As it was my first attempt I only used the basic card shape and the liner which was the eyes and kept my decoration simple.
I added a small piece of the dark brown card inside the card base to 'highlight' the beak, inked the edges of the card, and the 'feathers' and then added leaves cut from a punch and cuttlebug quilling die.
The sentiment pictured was removed and a little die cut one added but I forgot to take an update pic before posting it!
TFL, Ni :) x
Wednesday, 13 April 2011
Another Male Card!
Wow 2 posts in as many days! Shocking!
This is a card I made late last year, before I had a blog, but as I have been having to think about making male cards recently and I thought this was a good trick I have decided to post the card on here now too!

I know this card is again very simple, (my mens cards always seem to be as I dont use ribbon, flower embellies or gems etc), but it had never occured to me to use 35mm film in my crafting before!
The idea arrived because I couldn't find any photography themed decoupage or suitable digi images anywhere. Luckily I had an old film that had expired as I have used a digital camera for years and so I just pulled it off the reel!
The paper is from the DC Papermania Men's world pack, the die is again my Sizzix favourite and the embellishment was in a '10p each' box at a local craft shop! I was really pleased with how this turned out and the recipient thought it was brilliant as it was so different. :)
TFL, Ni x
Tuesday, 12 April 2011
The dreaded male card!!!
I don't know where the time goes, another awol stint from me!
In all honesty a lot of it has been enjoying the lovely weather we've been having, me and OH had our first trip to the beach and then a family bbq this weekend, lovely! Also lots of projects happening in the garden - a greenhouse, a mini 'patio' for the garden swing and a raised vegetable bed - so exciting!
BUT - I am back today to share another quick card!
My Dad asked me to make him a last minute card for a clients birthday lunch he had been invited to. I make no secret that like many other crafters this is a style of card I find very hard to create but I would not be defeated lol!
Here is the card:
 Headache time - no idea what colour or theme to use, do I have any suitable male style images?
Right, stash rummage for inspiration!
Aha! Found a box of these thick cardboard patterned tags that I bought in £land. About a dozen on a sheet so they are great vale for money and they come in lots of different sizes/styles in the same colour palette. Also they have glitter, ribbon, brads on them so are half embellished for you!
Used my Fruit Smoothie Sizzix alphabet to make the 80, added an 'M' brad for personalisation & layered this onto a large scallop square nestie.
Another tag for the lil greeting topper (which I matted onto some green card) a ribbon thread one this time. Added 2 star brads to finish and ta-daa! Sucess!TFL, Ni :) x
In all honesty a lot of it has been enjoying the lovely weather we've been having, me and OH had our first trip to the beach and then a family bbq this weekend, lovely! Also lots of projects happening in the garden - a greenhouse, a mini 'patio' for the garden swing and a raised vegetable bed - so exciting!
BUT - I am back today to share another quick card!
My Dad asked me to make him a last minute card for a clients birthday lunch he had been invited to. I make no secret that like many other crafters this is a style of card I find very hard to create but I would not be defeated lol!
Here is the card:

Right, stash rummage for inspiration!
Aha! Found a box of these thick cardboard patterned tags that I bought in £land. About a dozen on a sheet so they are great vale for money and they come in lots of different sizes/styles in the same colour palette. Also they have glitter, ribbon, brads on them so are half embellished for you!
Used my Fruit Smoothie Sizzix alphabet to make the 80, added an 'M' brad for personalisation & layered this onto a large scallop square nestie.
Another tag for the lil greeting topper (which I matted onto some green card) a ribbon thread one this time. Added 2 star brads to finish and ta-daa! Sucess!TFL, Ni :) x
Friday, 25 March 2011
Funky Hand - Word Book!
Just wanted to share a basic word book that I made for a colleague at work.
It was her 60th birthday and my work mates asked me if I could make a special card for her, so I explained the idea of a word book to them and they loved it! :)

Obviously the ladies name is Heather and as she does not have a favourite colour I chose these lovely pastel shades from the Dreams Come True cd-rom in the lovely floral pattern.
As the name is quite long for a word book I trimmed the right edges off and cut right to the outline of each letter.
Then I laid them out, overlapping the letters slightly and trimmed off the left edges to make a level spine which I staped together and added ribbon to decorate.
The last two pages had to be extended with the offcuts from the other pages but I lined the lines in the pattern up and you could hardly see the join as the insides of the pages looked like this:

Where the joins were I made sure to place a greeting circle and or flower embellies i made with a punch and some glitter glue.
To make the greeting circles I used my nesties to cut the circles out of complementary card, a plain colour for the top layer and a dotty embossed pattern for the base layer.
Each member of staff at work was given a circle and asked to write their birthday message on it.
She was thrilled with it and I was too as I think it's a really lovely way of using a word book.
TFL, Ni :) x
Sunday, 20 March 2011
Get Funky! Challenge - Zing Into Spring
I'm back on track this month for the new Get Funky! challenge - Zing Into Spring with my card ready for uploading. :)
This month's challenge is hosted by Lou and her criteria is using spring colours of greens, yellows and lilacs as well as the obligatory FH product.

The card is for a relative who needs some real cheering up right now so I needed a quick card, with a basic, not over the top, layout and this colour scheme seemed perfect!
The backing paper is actually a spare page from a word book I've just made (to be uploaded soon!) using the Dreams Come True cd-rom hence the nice purple lines on the edges of the sheet, and it fitted perfectly on this DL card blank. :)
The frame is one of a pack from my stash as are the daffodil stickers.
The thinking of you sentiment is from my JustRite stampers set and the scalloped ovals are nesties.
A simple card this time, yes but I hope it does the trick of bringing a smile to the face of the recipient.
TFL, Ni x :)
Wednesday, 16 March 2011
My FF hosted Challenge - Sketch!
Morning! Ok so I am always blogging my FF challenge cards from the DC forums, well now I'm hosting the challenge for the first time and this is the sketch I have come up with for it:
 I can't take credit for the layout as I saw this card in a big pile of samples on tv recently (can't credit the maker as no names were given, but thank you for the inspiration!) and I loved the layout so I made a sketch!
The challenge is here so if anyone wants to join please pop over, the more the merrier, I'd love new people to join us! :)
If you are not a DC member then it's free & quick to sign up and its a fab forum, not just for great challenges!
Here is my card:

I used my favourite colour purple which I normally revert back to for safety when trying something new lol!
The stamped image was a gift that I coloured in (very basically!) with promarkers and layered onto plain & scalloped circle nesties.
Scallop border punch is DC, embossing folder is CraftsToo and I inked the embossed bits to highlight.
No idea where the sentiment stamps came from as they're so old, I dont care for the text much anymore but its all I have that worked for the strip design!
Ended with my new card candy, never used it before and thought I needed to try (there goes my stash diet!), I quite like the look and love that the white will colour with promarkers to match other images.
TFL! Ni :) x
Monday, 14 March 2011
Get Funky! Challenge - Show Us Your Heart
This is my last minute submission for the latest Get Funky! Challenge hosted this time by Jules.
For the 'Show Us Your Heart' challenge the criteria was as always to use at least one Funky Hand product AND you needed to include a heart too.
Here is my card;

For the 'Show Us Your Heart' challenge the criteria was as always to use at least one Funky Hand product AND you needed to include a heart too.
Here is my card;

Another shaped easel from me, I think I am officially addicted lol! I just love them!
It's pretty obvious to see where one heart is but it's not as easy to tell from this photo that the 3 gems on the base of the card are also little purple hearts too! :)
The purple & green backing papers are the same design and are from my 'Dreams Come True' cd rom, the 1st of the excellent Papercraft Factory releases from FH! They are from the So What! & Just Happy collections.
The FF bear has been stamped and coloured with promarkers and no my colouring hasn't got any better yet! (Just realised this is an older photo as the heart also has glitter on now too!)
The letters were cut on my bigshot, using my quickutz Phoebe alphabet.
The flowers were made using the Daisy cuttlebug quilling dies with my bigshot and also have glittery centres now!Hope Mum likes this as much as I do! TFL! :) x
Wednesday, 9 March 2011
FF Challenge Card - using home made 'nesties'!
Here is the card that I made for a recent fort-nightly DC, FF Challenge.
Our host was Laineymo and her brief was to make a 'Bright & Springlike' card, using spring time yellow & green colours and gingham!

The gems were in a set of 16 pairs of adhesive corners that I picked up for 99p in Dunelm's sale.
There are three layers of gems to each corner, however being frugal and not wanting to go over the top on the 'bling', I just snipped off the larger outer layer to add to this card and will use the smaller double layer elsewhere.
By doing this I am making 16 pairs into 32 pairs, thats 3p per pair, not a bad buy then!

Our host was Laineymo and her brief was to make a 'Bright & Springlike' card, using spring time yellow & green colours and gingham!

The gorgeous image was a stamped one, donated by a lovely DC member (Thank You!!! <3 ) and coloured in very basically with my promarkers.
The gems were in a set of 16 pairs of adhesive corners that I picked up for 99p in Dunelm's sale.
There are three layers of gems to each corner, however being frugal and not wanting to go over the top on the 'bling', I just snipped off the larger outer layer to add to this card and will use the smaller double layer elsewhere.
By doing this I am making 16 pairs into 32 pairs, thats 3p per pair, not a bad buy then!
Now, I have a small love affair with labels 1 nesties (but do not have the cash to buy them just yet!) and so when I saw this packaging left over from some Papermania chipboard shapes I knew I had to use it!

As you can see I had 2 of these sets, I kept one as it was (left image) and cut the blue edges off the other.
To make my large shape I traced around the original pack top and bottom onto plain copy paper, rotated it 90 degrees and drew around the top and bottom again to join the sides up, simple!
To make my large shape I traced around the original pack top and bottom onto plain copy paper, rotated it 90 degrees and drew around the top and bottom again to join the sides up, simple!
Now I have 2 templates with a striking similarity to labels 1 just from my recycling!
I layered all my papers up, drew a green line around the 'nesties', added the bear on some foam pads, the adhesive corners and stapled the ribbon on with a mini stapler with loads of colour staples that I bought from The Works, for just 99p again! Ta-daa!
TFL, Ni :) x
Tuesday, 8 March 2011
2nd & 3rd Blog Awards!
Ok so finally I am back with my next post on my other blog award, which also turned into my third one after some comments! :)
So my thanks go to Kate & Carrie, both of whom I would like to call online friends as well as fellower Docrafters who I take part in challenges with and love their work! :)
This award is the 'Stylish Blogger Award'

However I hope neither of these ladies will be offended but I have decided not to pass this award on.
This is due to the fact that I am so very new to blogging and have not devoted much time to it yet that I have found it very hard to find many smaller blogs that I follow that do not already have this award.
Also as wonderful as these awards are I do not wish to get into the habit of just passing these along to people when in reality they are a form of chain letter, and I do not want others just starting out with blogging to feel they must keep passing these on too instead of why they actually started their blog, like me, to share their creations!
I have decided that if I love someones blog, and am truly inspired by their work, I am goin to make myself a little icon that I will offer to people instead of one of these mass circulated awards, they may not want it but thats how I am going to show my appreciation in the future!
I hope this post does not offend anyone and I do feel it is an honour to think that someone may want to pass an award onto me in the future, but I hope they will accept my decision to decline greatfully.
Thanks for reading if anyone even got this far! Ni :) x
So my thanks go to Kate & Carrie, both of whom I would like to call online friends as well as fellower Docrafters who I take part in challenges with and love their work! :)
This award is the 'Stylish Blogger Award'
To accept the award you must share 7 random things about yourself:
1. I have only been abroad on holiday once, that was Kos when I was about 19!
2. I am a neat freak, everything has its place to live and must be lined up just so, lol! The stuff that doesn't have a place yet is a complete tip though!
3. I went back to college and completed my Business Management degree in September 2010.
4. (follows on from above) Was graded a 2.1 with 0.1% off a 1st. Luckily my tutor realised admin had mis-typed my scores and actually I'd earnt myself a 1st Class honours degree!
5. I love music and going to 'gigs'. Most recently was Foo Fighters, though the best was Green Day! :)
6. I love things in the style of Rennie Mackintosh, I have various vases, mirrors, photo frames, jewellery, lamps, candles and probably more!
7. I am a big supporter of the National Trust, I love visiting their houses and would love to work for them one day!
Well that's that, not very exciting I'm afraid!
***
Next I am supposed to award 15 recently discovered bloggers with this award.However I hope neither of these ladies will be offended but I have decided not to pass this award on.
This is due to the fact that I am so very new to blogging and have not devoted much time to it yet that I have found it very hard to find many smaller blogs that I follow that do not already have this award.
Also as wonderful as these awards are I do not wish to get into the habit of just passing these along to people when in reality they are a form of chain letter, and I do not want others just starting out with blogging to feel they must keep passing these on too instead of why they actually started their blog, like me, to share their creations!
I have decided that if I love someones blog, and am truly inspired by their work, I am goin to make myself a little icon that I will offer to people instead of one of these mass circulated awards, they may not want it but thats how I am going to show my appreciation in the future!
I hope this post does not offend anyone and I do feel it is an honour to think that someone may want to pass an award onto me in the future, but I hope they will accept my decision to decline greatfully.
Thanks for reading if anyone even got this far! Ni :) x
Tuesday, 22 February 2011
Wow! Blog awards x 2!!! =D
Yes thats right, I have been offered 2 blog awards over this weekend! Such a wonderful suprise!
The 1st is the Liebster blog award! This was given to me by Redsmudge, the lovely Clare! Go visit her fab blog here! =D
This award is aimed at bringing unknown good blogs to light, (so you are asked; please don't tag somebody who already has a ton of followers) and in accepting the award I have had to agree to the following conditions:
1. You have been tagged, do you want to accept? - Yes, thanks so much, I am thrilled!
2. Then create a post on your blog and post the love blog photo. Done!
3. Link back to the person who gave you the award and say if you accept. Also done & yes please I accept!
4. Choose 3-5 of your favorite blogs to tag, link these in your post too and tell the lucky people they have been tagged. Yep done that too!
So here are my chosen 5, mostly from DC, as that is where I spend most of my time and have made my first blog friends!
1. Skated, Kate, a lovely and talented lady & fellow DC member. Go visit her blog here!
2. Incy, Kay, a frequent DC poster, very friendly and I'm excitedly following her new adventures with SCAL! Stop by her bog here!
3. Laineymo, frequent host of the FF challenges over at DC that I love to take part in! I love her layouts and style! Check out her blog here!
4. Jules, a DT member for Funky Hand, obviously I'm a new follower of her gorgeous blog but I love her work! She is running the FH challenge right now too so I must get working on my entry!
5. Kathy, Katalytic, another new blogger who found my blog via DC and I'm glad she did as her work is gorgeous! Find here blog here!
Will be back with my 2nd award later as just seen the time and must dash off to work, boo!!! :(
The 1st is the Liebster blog award!
This was given to me by Redsmudge, the lovely Clare! Go visit her fab blog here! =DThis award is aimed at bringing unknown good blogs to light, (so you are asked; please don't tag somebody who already has a ton of followers) and in accepting the award I have had to agree to the following conditions:
1. You have been tagged, do you want to accept? - Yes, thanks so much, I am thrilled!
2. Then create a post on your blog and post the love blog photo. Done!
3. Link back to the person who gave you the award and say if you accept. Also done & yes please I accept!
4. Choose 3-5 of your favorite blogs to tag, link these in your post too and tell the lucky people they have been tagged. Yep done that too!
So here are my chosen 5, mostly from DC, as that is where I spend most of my time and have made my first blog friends!
1. Skated, Kate, a lovely and talented lady & fellow DC member. Go visit her blog here!
2. Incy, Kay, a frequent DC poster, very friendly and I'm excitedly following her new adventures with SCAL! Stop by her bog here!
3. Laineymo, frequent host of the FF challenges over at DC that I love to take part in! I love her layouts and style! Check out her blog here!
4. Jules, a DT member for Funky Hand, obviously I'm a new follower of her gorgeous blog but I love her work! She is running the FH challenge right now too so I must get working on my entry!
5. Kathy, Katalytic, another new blogger who found my blog via DC and I'm glad she did as her work is gorgeous! Find here blog here!
Will be back with my 2nd award later as just seen the time and must dash off to work, boo!!! :(
Friday, 18 February 2011
Oh My Crafts! - Demo Event. =D
Just a quick post for today and no crafty project as such, just crafty name dropping lol! ;)
I had such a fun evening yesterday; myself and my crafty friend attended a demo evening hosted by Oh My Crafts! Yes Kevin & Tony from the actual US company are over here doing a few small demo events using vinyl and glass etching cream.
It was fab, although I had the misfortune of getting picked on to help out in one of the demos lol; not really misfortune at all, it was a bit embarrassing but good fun!
I'll upload a pic later of 2 little coasters we made using the vinyl. Happy Ni! :)
Sunday, 13 February 2011
Twisted Double Easel Card - Mini Tutorial!
Hi, thanks for stopping by!
This is my first tutorial post and its really only a mini one as it is condensed but hopefully it will help at least one person if they are wondering how to make this style of card! :)


This is my first tutorial post and its really only a mini one as it is condensed but hopefully it will help at least one person if they are wondering how to make this style of card! :)
These are my new favourite style of card at the moment and really simple to make:

You need to start with a square piece of card. Mine was 21cm x 21cm which folds to make a DL card size - so you can use a DL card blank and easily find an envelope to fit it in! :)
Fold the square in half and make a cut from the middle of the fold (thats 10.5cm along) down to the bottom edge of the card.
Score from the middle of the fold (same point that you made your cut from) on a diagonal angle down to the bottom corners of the card and then mountain fold all the score lines to give you this:

Next cut 2 topper squares of card at 10.5cm x 10.5cm and attach to the front triangles on the base card. Remember, only stick the squares to the two 'inner' triangles on your base card or it wont fold and work as an easel. I made a note of where to put the glue in the pic above so I dont forget!
Lastly, make a stopper however you wish, mounted onto foam pads to lean the topper squares against.
I used two circles on the FH challenge entry in my last post and the one below is just a strip of card that I decorated with a border punch.That's it, card base complete! Told you it was simple! :)
***
Here is another double easel card I recently created for two DC challenges so you can see a finished sample:

This was for the:
* The ABC Colour Challenge 'J', colours Jet Black and Jasmine Yellow.
* Clare Curd's Weekly Sketch Challenge.
Hope the tutorial is ok, any comments/friendly criticsms welcome!
Thanks for stopping by! Ni xThursday, 10 February 2011
My 1st 'Get Funky!' Challenge - Yay! :)
Well I said I had another Challenge project to share and so without further ado... this is it! :)

It's a special one as this is my first submission for a Get Funky! challenge. Although I love the Funky Hand cd roms that I have I couldn't take part until I started my blog - woo!
This months challenge was Going Round In Circles (see challenge here!) and Anice offered a freebie backing paper download on the Funky Hand website.
I though the paper would make a fab base for my double easel card (my 1st go at this technique also!) and I punched out two circles from the sheet of paper, mounted on foam pads, to use as the stoppers.
The sentiment is sizzix, the scallop circle a nestie, the large butterfly a DC die and I have no idea where the mini punch for the other butterflies came from lol!
The jar is so inkeeping with the theme as the whole thing is decorated with circles! :)
Again using nesties I cut the two patterned paper circles and layered up with a scalloped circle in between. On the top to finish it off is a large green brad and a clear gem.
To jazz the sides of the jar up a bit and use up the odd leftover circles from my A4 sheet I used a circle punch to cut the shapes and then added ribbon between two back-to-back circles and fixed it over the wire closure for detail.
I'm so pleased with how both of these came out, fab new card technique and, although it was meant to be a gift jar to go with the thank you card, I'm going to have to make another one as this one now lives on my crafty shelves filled with my favourite type of cakey/biscuit snack!!!
TFL. :) x
Wednesday, 9 February 2011
Quick Cricut Cards!
Oh dear, too much time has passed yet again in between posts for my liking! Just never seem to have enough time to sit and focus on writing, maybe I should waffle less, lol!
However I am pleased to say that I have been crafting a bit! 2 quick cards follow today using my still so very new cricut! & I have 2 challenge projects ready to share, with another in progress! :)
Here is the first card,


Again made using Paper Lace but just the font function this time to spell the name. Clear embossed the tiny flowers (from the DC freebie cupcake set!) and added a few gems, ribbon and a 'fake' bow! Love it!
So that's it, 2 really quick simple cards, but each perfect for the recipient IMHO and I hope they like them! :) x
However I am pleased to say that I have been crafting a bit! 2 quick cards follow today using my still so very new cricut! & I have 2 challenge projects ready to share, with another in progress! :)
Here is the first card,

A really simple card made using a phrase and its' shadow from Paper Lace in the local football team's colours and some peel-offs stuck onto shiny white card and cut out, then layered onto foam pads!
Next up is this pretty girlie card:

Again made using Paper Lace but just the font function this time to spell the name. Clear embossed the tiny flowers (from the DC freebie cupcake set!) and added a few gems, ribbon and a 'fake' bow! Love it!
So that's it, 2 really quick simple cards, but each perfect for the recipient IMHO and I hope they like them! :) x
Sunday, 30 January 2011
FF Challenge card - ends 30th Jan
Another challenge card from me today, really pleased with some of it, not so sure about the overall finished card though!
This was another DC challenge, this time by CrossStitchQueen, another with a recipie to follow:

This was another DC challenge, this time by CrossStitchQueen, another with a recipie to follow:
* nice pastel colours
* at least one ribbon/bow
* a sentiment/greeting
* backing paper(s)
* a stamped image of any FF bear you wish
* PLUS he/she has to have a friend too.

As the only FF stamp I own is the freebie one from a previous DC mag I decided to attempt something I have seen Barbara Grey do with her stamps, a reflection technique.
You ink up the stamp then carefully roll the brayer over it to 'stamp' the image onto it. Next roll the brayer onto your chosen card/paper and the image will print backwards - a reflection of the original image! Tadaa! (If you look at my bears the one on the right is lighter in colour as this is the reflected image and some of the colour depth seems to have been lost in the transfer process.)
I wanted it to look like the bears were holding the greeting as a banner, not sure it's worked very well though as I didnt notice to start with but the cord is actually coming from the back of their paws and I needed to make a wider card so I could 'hang' the banner from the cord top rather than in the middle!
The rest of the card is pretty obvious, my favourite Happy Birthday sizzix die greeting, a paper ribbon and I cant remember where this spotty backing paper was printed from, oops!
Tuesday, 25 January 2011
1st Cricut card & a mini canvas!
Almost another week gone by, crikey I've been so busy!
Here is a pic of my first proper card I made using my new Xmas Cricut Baby Bug! YAAAY!!!!! :)
Also used my new MS Monarch butterfly corner punch, and the small and large xcut flower punches.


Here is a pic of my first proper card I made using my new Xmas Cricut Baby Bug! YAAAY!!!!! :)
Also used my new MS Monarch butterfly corner punch, and the small and large xcut flower punches.

I have just bought one of these little mini easels to put my cards on to take my photos and it came with a mini canvas. My cousin is decorating her little girls bedroom and so I thought this would look cute on her wall!

Again just a few little flower die cut/punched shapes, canvas painted with pink emulsion and the butterfly is a chipboard shaped I triple embossed with pink ink & embossing powder. I really like this and my cousin liked it so much she is putting on the bedroom door! :)
Another Cricut phrase card on the way soon, in very specific colours! Ni x
Wednesday, 19 January 2011
3 Birthday Cards.
Wow 2 posts in 2 days! Still this is another quickie just to prove i have been crafting.
The other 3 cards I mentioned yesterday were for the birthdays of my cousin & a friend I work with.
These two are pretty similar,


The other 3 cards I mentioned yesterday were for the birthdays of my cousin & a friend I work with.
These two are pretty similar,


and this one is using the new DC freebie cupcake stamps and the MS border punch! Yum!

I'm also working on a mini canvas and 2 more birthday cards today! Busy busy Ni! Pics to follow in next few days! :) x
Tuesday, 18 January 2011
Oopsy!
Wow how bad of me, I have not posted in over a week, hardly a good start to my blog is it!
In my defense I have been busy! Completed two cards for DC challenges, another FF one and the Recycle an Xmas card one!


In my defense I have been busy! Completed two cards for DC challenges, another FF one and the Recycle an Xmas card one!


The FF one was Laineymo's challenge. You had to follow the recipie of 1 bear, 2 backing papers, at least one flower and a sentiment.
The Recycle an Xmas card one was by Lisaxx. Her challenge was to make a card using parts of a shop-bought card you had received. I got this cute lil FF card which was only about 3.5" x 3.5", trimmed the top and bottom off and matted it onto red pearlescent card to highlight the red of the post box and the santa hat, also it matched this tiny strip of ribbon I had left over!
I also have another 3 cards I made for a family members and a friends birthday that I plan to share with you tomorrow! :)
Subscribe to:
Posts (Atom)