Hello and Welcome!


Welcome to my little place in the blogging world. :)
I like to share details here for the DT projects I create and also some of my own tutorials.
I would love you to leave me a comment so I know that you have visited me.
Thanks for stopping by! Ni :) x
Showing posts with label Xcut Nesting Dies. Show all posts

Wednesday, 3 October 2012

Creativity Club DT share - Tulip Christmas

Afternoon all, a very much later than planned post from me today but I had a friend come round to start planning a London birthday trip - sight seeing, shopping and a show, whoopee!!


Anyway..... todays card uses the new Tulip Christmas collection and is an image from one of the A4 decoupage packs (4 sheets of decoupage and 4 sheets of papers for £3, great value!) which make 8 decoupage images per pack and contain duo papers, two patterns with a border strip accross the middle to cut up as you wish.

Now my card doesnt use paper from the pack but rather a fab stripey one from the Love Christmas, Creativity Club download andmy  layout inspiration came from todays daily sketch no.94.


The flower embellishment was made using the gorgeous new Home For Christmas paper & Bloom, xcut nesting dies and was inspired by the tutorial from Jo Austin on Creativtiy TV recently. Thanks Jo! :)
Aslo used, xcut scallop broder punch, red shimmer dome stickers and Anitas sentiment ribbon.

*** I hope you like this card, dont forget to leave a comment on the original post at the top of the page, and also here to have two chances to win my fab Creativity Club 6 month menbership blog candy. Ni. x ***

Sunday, 23 September 2012

Easy Swing Card - Photo Tutorial

Good morning everyone, well finally I have made it back here to post my tutorial for the style of Swing Card (aka. Flip Card) that I shared in my previous post.

After showing this technique to a large number of crafters at my Docrafts demonstrations over recent months it was decided that my traditional style of demo freebie written tutorial sheets would be much too complicated for this technique and so a photo tutorial with notes has been created.
Bare with me, I hope it makes sense, please let me know if you think any changes need to be made and I'll update as requested. :)


Remember, I have used my parenthesis rectangle no.2 dies from xcut but you can use any symmetrical shape that has an easily identifiable centre (I will do a quick post this week showing how to easily use a circle too!). These measurements make a 5 1/4" card.

Ok so without further ado here is the tutorial in 10 very easy steps.....
*******
1. -  First take a sheet of card that measures 7 1/4" by 5 1/4".
2. - Work with the card horizontally and score at 2 3/4" and 3 3/4"

*******
3. - Next take you chosen die and place it on top of the card, lining up the centre of the die with the
2 3/4" score line.
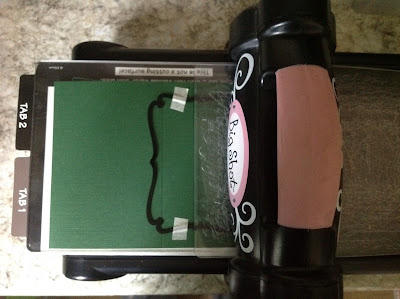
4. - Tape the die into place with low tack tape (stick onto clothes if necessary to de-sticky it a little so it will not rip your card when removed). Place the tape over the small middle panel as shown below, this is a good visual reminder of where not to cut or you will ruin the swing mechanism!


*******
5. - Place the card on the base plate of your chosen die cutting machine and feed the top plate through and line it up with the 3 3/4" score line as shown below. Remember, don't cover the tape! Roll through your machine.
By making your sandwich is this staggered way, when you roll it through your machine you will only cut where the sandwich is complete, so in this case the small area on the right side of the score line.


*******
6. - Once out of the machine, turn your card round 180 degrees and make up a new staggered sandwich to cut the other side of the die, as again shown in the photo below. Remember, don't cover the tape! Roll through your machine.
7. - Once cut, remove the die and lay the card horizonally as before.


*******
8. - Now fold the left side of your card over towards the right edge, creasing at the 3 3/4" score line.
9. - Then fold the same side back to your left creasing on the 2 3/4" score line to give you a finished card blank that will stand like this.....


*******
10. - Decorate as required!
Remember that because you used a die to cut the shaped swing panel you can use the same die for a perfect decorative layer as on the front of my card using the tartan paper, AND you can use the smaller shapes with plain card to create a space to write your message to the recipient.


*******

Right, phew! That's it, tutorial done! Now over to you to see what you think of it!
Thanks for stoping by today, I hope it has been a useful visit and I welcome any comments. Ni. :) x

Saturday, 28 April 2012

Get Funky! Challenge - Let's Get Sentimental!

Good afternoon!
I just wanted to stop by and post my card for the latest Get Funky! challenge which this month has the theme of Let's Get Sentimental.


I have opted for a really simple layout this month in order to make the sentiment the focal point of my card as the theme suggests. :)

I've used some more papers from the newly released Spring Has Sprung download, I think the daisy design is my favourite right now but ask me again in a few days and I'll have probably changed my mind to one of the other lovely designs!

I cut the papers out using the xcut nesting die - postage stamp, mounted them on to green card and used a black fine liner pen to draw around the edge of the shape to highlight it. The sentiment was stamped onto the same card and then using a small circle punch I punched out one of the daisies to cover up the star in the stamped image and tie it in with the papers.

What you cant really tell from the photo is that the papers are printed onto a thin pearlescent paper which gives a lovely look and everything is mounted onto a pearlescent card blank.

Supplies:
Funky Hand - Spring Has Sprung download
xcut nesting dies - postage stamp
Papermania - 'Thank You' typography stamp/die duo

Thanks for stopping by! Im now off to find some paracetamol to try and get rid of my headache so I can pop into my craft room for a few hours. My new Docrafts kit arrived this week and I haven't felt well enough to play with it yet so its all systems go from tomorrow to get my usual 30+ samples made this week ready for my first demo on Saturday. I'll be back with some samples soon, promise! :)


Thursday, 5 January 2012

Happy New Year!

... well I'm only a few days late! :)

Now for those who are observant you will have seen (on my sidebar) that Saturday is my first Docrafts demo of 2012, hurrah! So for the past few days I have been busily prepping projects using all the new collections.

I have also made one new years resolution, I plan to do at least one blog post per week. I want to keep up to date with sharing my demo cards and the mini tutorials I'm taking to the demo's with me too.

For my first share of 2012 I have produced a scrapbook page using the GORGEOUS new Portobello Road products and the xcut scalloped bunting dies..


The mini photos are a first for me, they came from one of those in-store instant photo printers where I selected 4 images to be on one 6"x4" print. This was a nice way to include some of the photos we took at midnight as well as one of ourselves in the hotel we were staying in.

Right, I'm off to start making some Hot Diggity Dog cards now with the lovely new stamps. Back with more uploads soon! Ni. :) x

Thursday, 30 June 2011

Tatty Ted Challenge Card

Well I am truly a terrible blogger! Over a month since my last post, shows I have sadly not been crafting as much recently, think it's partly the lovely weather to be honest and I have been playing with my cricut and SCAL rather a lot!!

Today I'm sharing my card for the Tatty Ted Challenge I've been hosting over on DC, the sketch is:


The only criteria was that I wanted to use the black frame in the sketch as an actual frame rather than just normal matting/layering. So here is my own card:


The background flowers are using a Tapestry Peg stamp inked in black.

The paper is a 12x12 gorgeous Doodlebug one that I got in a sale for 20p!


The TT image has been recycled from the packaging of my TT peel-off's. :)


The frame is the new xcut NESTNG DIES!!!! Woo! Been waiting ages for these and have to say I'm really impressed with them, lovely designs and a fab price too! This is the parenthesis design.


The little sentiment was a freebie from a DC creativity magazine, I just cut off the borders!


Embellishments from DC, butterfly was a DC punch.

Thanks for stopping by. Ni :) x