Hello and Welcome!


Welcome to my little place in the blogging world. :)
I like to share details here for the DT projects I create and also some of my own tutorials.
I would love you to leave me a comment so I know that you have visited me.
Thanks for stopping by! Ni :) x

Monday, 8 April 2013

Visible Image - Finally got to play!

A big hello and welcome to anyone that is out there and reading my ramble for today. :D

I know have been absent from the blogging world again and somewhat detached from the real world a bit too. Luckily I have some fabulous crafting friends who are there for me, a few days away to visit my wonderful friend Diana (who also stepped in as nurse to help me look after my severely badly burnt and very painful hand) and a small spend up at the nec and a smaller craft show are all helping me try to get back on the path to my 'normal' (as if lol!) self. :)

As I've been feeling a bit down my mojo seems to have wandered off too so what better way to search for it again now that my hand is healing nicely, than playing with some new stash; and the challenge over at the visible image blog this month is to "Get Stamping!", so I have!
My card today therefore uses some fabulous, wonderful, gorgeous (yep ok, I know, you get it already, enough with the adjectives lol, but I love them!) stamps from Visible Image.


For my focal point I have used the gorgeous small butterfly which is so lifelike, detailed and delicate, oh and it looks fab using gilding flakes but I haven't made that piece into a card, yet...

Ok, so, first I stamped the butterfly onto the back of some chocolate brown card and cut around the image to give me a solid base layer, then on top of these I added a version stamped in aged mahogany distress ink (thanks Diana! x) and blended all over with tea dye.
I don't know if you can see it from the picture but I added some tiny beads from a nail art set (found in Pounland!) to their bodies for a bit of texture.

I made a horizontal a6 Kraft card base and stamped over it with the amazing Grunge Flourish in tea dye ink for a kind of watermark effect but with a bit more depth. This flourish stamp is so clever, you can just use the grungy edge, or the flourish bit or both, a great touch.

The sentiment is a new die I picked up at the nec for a bargain price, so good it would have been rude to say no. ;) I just cut it from the same chocolate brown card and added it to a Kraft strip that I snipped at the ends to make into a banner. Easy.
Now I look at it I'm thinking I might add some ribbon tied around the spine, any thoughts welcome. I'll have a play with it again tomorrow and see.

I have really enjoyed playing again thanks to having some super stamps to kick start my creativtiy and I've already ordered another one so look out for a card featuring that very soon!
Also starting from this weekend I'm going to be back with a 5 day Funky Hand feature here, sharing some projects made using their fabby new downloads.
Thanks for stopping by, Ni. x

Sunday, 17 February 2013

Build a Scene Dies - no.2 Hot Air Balloon

Wow what a week! It started ok but just got worse lol!
It went from one then to three members of staff off (in a shop with a total of only 6!), an unexpected visit from some Head Office managers and me managing to strain my back and ending up hobbling around the shop like I was 90 instead of 30! Luckily its easing off a little now but I may have to go and see someone next week to get back to 100%.
The highlight of the week was a superb Friday evening spent with my friend Lisa at one of her Stampin' Up classes. We made 2 gorgeous cards with new products, saw some of the sale-a-bration items in the flesh and I came away with a huge bag of goodies I'd already put in my order for, can't wait to play!
Saying that..... I really need to stop buying for a while and start playing, my 'inbox' tray is overflowing with things waiting to be created with for the first time, oops! :)


Right, on to my shares of the day and as the title says I'm carrying on with the new Xcut Build a Scene die sets. I know some people seem to have had some trouble with these dies but me and my Bigshot have had no issues at all, just be careful with the string section for the balloon, maybe add some wax paper, use a tumble dryer sheet on the die or Jo Austin's new tip shown on Create and Craft recently, a dry baby wipe between the card and your die!


Ok so obviously this first card is a stepper card, I created the base from scratch and got a bit over excited with the clouds which meant they ended up being a bit high, but you get the idea, I just loved the 3D feel of it.

The cloud dies have no bottom to them, as in they do not cut a complete shape, just the top of a cloud outline so that you can cut the dies next to each other to get long cloud strips (great for a scrapbook layouts) and so that you can make them any depth you choose. The set also comes with some little whispy sort of shapes you cut into the clouds to look like the wind blowing, love those sort of details!


Now this one uses the die a little differently and shows the versatility of it. I have just cut the solid base section of the large balloon in some of the gorgeous Spots and Strips capsule collection papers and overlaid them onto a DL card, anchored them with twine tied round a button and cut myself another little cloud strip. This would be a lovely card personalised for a child. :)

I've also done another card using the small balloon shape turned upside down, cut from gold card and mounted into red/green to give a gorgeous (yep you guessed it, sorry!) Christmas bauble! Check out my super talented crafty friend DianaC's Docrafts gallery for her 2 bauble cards as I just copied her idea.

Right, time to hobble off for breakfast and then see if I can manage to sit in my craft chair for an hour or so and play with some of that lovely new stash that's calling out to me! I'll be back Tuesday for one of my last Creativity Club DT posts. X

Tuesday, 12 February 2013

Creativity Club DT Tuesday - A sketch and a 3D flower.

Morning bloggers! Well I am now up and about to set off to work ready for my 6am start but before I go I wanted to post my Creativity Club DT share for today and again I am sharing 2 cards.
Sorry about the poor light this early in the day lol! I'll redo them later.

Both of my cards today use the Country Companions, Sunshine Meadows collection.
This first card uses one of the exclusive daily sketches available to download within the creativity club and I have so far kept the card very simple and true to the design. However when it is ready to be sent to one of my young cousins I will add personalisation with the recipients name and age in the blank areas. I love Sketches as they are a great way to help you in those moments when your crafting mojo has deserted you!


This next card uses one of my favourite techniques from the Creativity Club the 3D flower embellishment made using the Xcut abloom nesting die. I have used two coordinating papers from the Sunshine Meadows collection, a pale blue/white spot and one with floral pattern.
The watering can Embossabilities sticker has been added to a tag cut from the Happy Days die and I have threaded it onto a strip of the striped paper, layered with a blue ribbon from the same pack.


I hope you like my cards today and don't forget to stop by the Creativity Club downloads section for a new sketch every day and a new download collection every Monday, this week it is the gorgeous Paisley in Cream set with a Mothers Day theme. If you are not a member of the Creativity Club yet then head over to the Docrafts website, here, for more information.

Sunday, 10 February 2013

Docrafts meets Tim Holtz, Cogs everywhere!

Well, hello to you bloggers!
I had another fantastic demo yesterday at Capture the Magic, showcasing the most recent Docrafts releases and whilst having a quick broswe around the store myself I noticed the Steampunk, On The Edge die on sale at half price! Needless to say with my current fixation on the Chronology products I HAD to buy it!
So today's first card is one I made earlier today whilst having a quick play with that new die. :)


I've also been watching Ali Reeve on C&C and wanted to try embossing on a drinks can so first used the Cogs Tri-Boss folder and then inked it with a promarker before cutting the metal with the on the edge die. It gives a really fab effect, I need to stock up on fizzy drinks cans I think!

Originally the cog strip was going to be on the left side of the card, on the edge! ;) Ok fine, but then I realised that with the metal being light in colour and quite textured it would not show up against the orange clock paper so it had to be moved to the other side and make it into a split card. Not bad for a first attempt, want to play with it a bit more though so watch this space.....

The Pocket Watch die is fabulous, so many combinations of faces and using card in different colours means that no two watches need be the same!

Next onto a couple of quick mini projects from my demos,


The card is one of my favourite 4" notelets and the other project is actually a coaster to match my altered clock I posted here recently.
All the products are from the Chronology range except I additionally used the 'wave' border from the Nautical, Build a Scene die again to make a scalloped strip. The cog embossing folder was used on orange card and inked with black dye ink.

Right that's it for my shares today, I'm off to do some blog hopping this evening, love seeing what everyone has been creating over the week! Back Tuesday for another CC DT post. :)

Tuesday, 5 February 2013

Creativtiy Club DT Tuesday - Love but not love!

Well the original post I had planned for today has completely gone out of the window as I HAD to make a new card to share the fabulous new weekly downloads from the Creativtiy Club with you!

There are 2 collections this week, Love in Pink and Love in Red, featuring heart images and lovely text backing papers as well as more generic patterns and those patterns are what I have used to make this bright funky card today.


I have printed the stripe and zig zag papers from the Love in Pink download and then cut them down into strips and mounted them onto a card blank covered with a burgundy textured card.
The swirls are cut from one of the xcut border die sets, the happy birthday sentiment is from the Bookprint travel stamp set mounted on to one of the dies from the Speech Bubble set and the 40 was a blue cardstock sticker but is now red after being coloured with a zig alcohol marker!

I hope you like this bright card, its is perfect for the bubbly lively recipient and although it is a love download, not a heart in sight!

*****

I can not believe that it has been 6 months already since the first Creativity Club design team was announced for their 6 month term and now it is time for a new team! I have offered to give up my space on the team in order for a new crafter to join and showcase their talents with you; but you are not rid of me yet, as a demonstrator I may be popping up on the Docrafts blog in the near future!
I want to say a big congratulations to all the new recruits who will be sharing their work with you from March. The announcement was made today over on the Docrafts blog so why not pop over and meet them! :D


Sunday, 3 February 2013

Build A Scene dies - no.1 Garden Party

Oops! With a busy weekend and the same sort of start to last week I just could not get time to blog in between work and demo prep and then by the time I did I was falling asleep! I'll be sure to share 2 projects this week to make up for it! :)

Anyway I am here today sharing projects using the new Xcut Build A Scene dies, Garden Party. I have been using these die sets a lot at my demos after many enquiries from customers about how best to use them. Now, remember, although they are called Build A Scene and are obviously designed to build an overall full picture, don't feel restricted by that concept, you can just use selected elements as I have done here.


I have cut the single elements from Kraft card (still addicted to it!) and then on the 'orange' card (inspired from a project by Docrafts very own Jo Austin!) I also used the Artiste orange ink to edge the pieces. I didn't think of this on the 'party' card (I blame being super tired at the time!) which is a shame as that tiny bit of ink really does add dimension.

The party card also uses an element from the Nautical set, no boats there I hear you say?! Although if you look at the edge of the shelf/table the crockery is sitting on, yes that's it, a scalloped edge border. Its the 'wave' strip but instead of keeping the wave edge I kept the 'waste' cut and got a cute scalloped border, this die is now saying permanently in my kit, love it!

The bunting on both cards is from the Garden Party set but again instead of using the full shape I have cut it into smaller pieces. Instead of using solid coloured card why not try a patterned paper or paper piece them by snipping the individual flags from multiple solid and patterned papers, the combinations are endless, its another permanent addition to my die folder!


The paper, buttons and twine are from another new range, Spots And Stripes Capsule collection, a gorgeous range that is perfect as an every occasion stand by. Great pastel tones and generic spot or stripe patterns means this can team up with any stamped images, toppers or decoupage coloured in similar tones, and would work for birthday, thank you, get well, even love themed cards.

Here is another project using individual elements of the the dies along with the 12" double sided Designstax card from the Capsule Collection: 


How cute it that! It is called a Tea Bag & Cookie Holder, there is a pocket on each side of the holder and in the middle you suspend a cellophane bag containing a gift. I have made a mini note card for this example but on another version I have used a decorated tag to add my message. Instead of a tea bag why not add a store gift card to the reverse pocket, or a Lemsip if someone is ill. You can use the central bag for small edible items, jewellery or what about a crafty gift of die cuts, bows, small lengths of ribbon, buttons and brads? That would be sure to put a smile on anyones face!

Now I take no credit whatsoever for the creation of this project, I found the instructions whilst looking for projects to utilise double sided papers. The original idea was created by Debi Pippin and here is her blog post containing lots of samples and a video. Also Chiaki Haverstick has made a PDF tutorial using Debi's measurements which makes it really easy to understand, a huge thanks to both of these ladies for their work and for sharing it. :D

Well versatility definitely seems to be the theme of today's post! Keep looking at your crafty stash in many different ways to get as much use from it as you can! I'll be back on Tuesday (promise!) with more Creativtiy Club DT creations and again at the weekend to share projects using another Build A Scene set.

Tuesday, 22 January 2013

Creativity Club DT Tuesday - Happy Days


Morning bloggers!
Today I am starting a feature which will last for a few weeks, a regular Tuesday post showcasing the Docrafts Creativity Club exclusive downloads and/or sketches.

A new 24hr sketch is released daily and there are lots of saved sketches to go back and browse through. Also dont forget the digi stamp and project instruction downloads, exclusively designed projects in the gallery and the excellent creativity tv too!
There are over 200 exclusive downloads available, and some of them are VERY special papers which are selected especially for club members; these work independently or as complimentary additions to select Docrafts product ranges available in the shops like Forever Friends, Tatty Ted and the new Vintage Notes collection.

My project today uses one of these special paper downloads, the Happy Days set. It has 4 pages of designs featuring cars, cans and more all in the colours and style of the fabulous Happy Days range.


I used the red zigzag paper from the Happy Days designstax layered on to black card for the background of my card. I thought the zigzag looked a bit like tyre tracks to match the card theme.
The car paper from the exclusive club download was first trimmed down into a small panel and then split into three equal sections and mounted onto a single piece of black card to create the triptych effect.
The sentiment is from the Bookprint, Around the World, urban stamps and is my go to for masculine cards because of its block type font and label look, no fancy swirls or italics here lol!
I mounted the car panel onto foam pads for a bit of dimension and cut some cogs into halves and stuck them under the edges, they were cut using the xcut Cogs die set from the Chronology range. The two screw brads are also from the Chronology range.

So there we have it, a fairly simple card but great for a car fan. Right I'm off to do some more work on my Build a Scene die samples and I haven't forgotten that I said I would share them here too! ;)

Saturday, 19 January 2013

Blog Candy Winner! & Chronology Clock


Morning all! I said I would reveal the winner of the Docrafts Creativity Club membership today and so here I am!
I assigned each commenter a number so that even if you had posted multiple times everyone got an equal chance. Then I used an online random number generator to select the winning number for me so without further ado the winner is, 
no 6..... Jewelsmae with her comment "Congratulations on the new position. What a lovely professional looking card, not colours I would have thought of putting together but it really works"
Congratulations! Please get in touch with me at hyperni7(at)gmail(dot)com and I will pass your details on to Emma to arrange your membership. :)

I haven't forgotten my promise to share some projects using the new dies too but currently there are a few in varying stages of progress so you will have to bare with me for a little bit longer, back soon! X

--------------------

Aaargghh! A big thanks to Claire at my demo who told me the above scheduled post had not posted!
Sorry to keep you all waiting even longer for the reveal, so I have now edited my message for today into the above post to add my apology and as a little bonus am adding in a photo of my new project from this week...

It's another one of my upcycling projects!
This was an old silver clock that was being thrown away *horror!* by my mum so I saved it and took it to my craft room. I have been looking into making a crafty clock for ages but never found the time to shop around for the mechanism and with the release of the new Docrafts Chronology collection now was the perfect time to use it!

I covered the clock in the gorgeous orange clock paper using red DST and inked all the edges with orange dye based ink.
For the face I roughly cut the front paper piece to size, laid it over the clock face up and then using a fine metal embossing tool I made dents along the lines of the edge of the clear panel. Then I turned the paper over and cut along these lines using my craft knife and a metal ruler.
The decorative clock hands, clock face and brads are all metal embellishments also from the new range and the black cogs were cut from textured card using the new 9pc chronology cogs die.

The clock will now live on my windowsill and brighten up my craftroom with its funky orange colour. Right as it is still snowy outside I am not venturing anywhere today and am off to the craft room to make some DT cards using my new Xmas present printer (finally!) and the Creativity Club exclusive  downloads. :)

Saturday, 5 January 2013

Happy New Year & Blog Candy Draw Deadline.

HAPPY NEW YEAR crafters!!!

I know I am super late in posting that but I have been poorly for a few days with one of these cold bug things that are flying around. Luckily not the winter flu so no aches but just a really bad head cold.
Also I am still working extra hours within the new store which is keeping me very busy BUT mostly I had a very happy parcel arrive on Xmas eve eve, my new Docrafts kit, yay!!!
I spent 30 minutes pouring over it all and oohing and ahhing before I had to box it all back up and carry on wrapping the Xmas presents. :(

However I have now managed to spend around 30 hours on my first big prep of samples for my demonstrations which started today and I am loving absolutely everything in this new release. Look at this.....


Isn't it sooooo cute! I love it!
That's just a basic plastic memo cube covered inside and outside with the new Vintage Notes products.
Adhesive fabric in the green Garden Rose pattern, 2 styles of the lace borders from the same collection and coordinating crochet flowers complete with a green decorative pin. This is going to have pride of place on my craft desk ready for all my little notes as I do love lists/notes. :D

Wait until next time when I share some of the GORGEOUS new dies from the ranges too! So exciting!

*******

Also now that it is the new year I want to draw the winner of my blog candy, a 6 month membership to the Docrafts Creativity Club where you will be overwhelmed with the amount of benefits like super downloads, daily sketches, Creativity TV, our exclusive Design Team projects in the gallery as well as those from Docrafts Designers Jo Austin, Becky James and more all available to you.

I am going to let this run until midnight on Sunday and will do the random draw first thing on Monday morning.
Good luck to all that have already become followers and posted on the blog candy post and to anyone else who manages to slide in at the last moment!
Ni. X

Tuesday, 1 January 2013

Exciting 'news' and Blog Candy!

Blog Candy Post - Please scroll down for newer posts. Thanks.

Evening everyone, I'm back today to finally, officially, share some news. You may have noticed a new blinkie here on my sidebar, a picture on the Docrafts blog or even the announcement of the new Docrafts Creativity Club Design Team and I am thrilled to say I am a DT member!!!
The Creativity Club is a members only club with a huge list of benefits including the exclusive DT projects me and my fellow team mates have been busy creating already!
We will also all be sharing projects on our blogs using the download collections and daily sketches to give non club members a taste of what's available if you sign up as a member and so here is my first DT share, a Thank You card.

This card uses papers from the Retro Prints and You & Me downloads. 
Also from Docrafts are the typography thank you stamp, xcut scalloped rectangle nesting dies and dotted gold ribbon.

*****

Now, to the second part of my post. Emma Collins, Creativity Club manager has kindly offered prizes of a 6 month Creativity Club membership for all of us DT members to share as blog candy giveaways! :)
To be in with a chance of winning this fabulous membership candy all you have to do is become a follower of my blog and leave a comment on this post.

Right a big Good Luck to everyone and I hope to 'see' a few new faces around here very soon. :) Ni. x 

Sunday, 9 December 2012

Im having crafty stash withdrawal symptoms!

Happy Sunday bloggers and another big welcome to my recent new followers! :)
I know my posting has been a bit sporadic again recently but I do have a good reason for this which I know a lot of you will understand, sometimes 'real life' gets in the way of crafting time and this is one of those times, and don't even talk to me about finishing the Christmas shopping yet!!!

A few of you may know I was recently promoted at work and so with this new job role has come a lot of paperwork training, then travelling to another store an hours drive away and working as a staff supervisor. Helping to set up 2 new stores, one of which I have just transferred to in the last week, and then helping to organise, promote and run the new store which has mean an extra 10+ hours a week away from home and my beloved stash, also we have no Internet yet so I can't even blog on my lunch break! :(
Phew even writing about it all is tiring me out, so anyway you can see why I have not been able to make it into the craftroom much as I have been shattered in the evenings! When I have been in there I am trying to get ahead on my DT work and have decided my New Years resolution is to be more advanced with my DT prep if possible and get blog posts scheduled so I have a good quantity of posts to share on a regular basis, I am also working on new tutorials to share at my 2013 Docrafts demos. ;)

(Side note - More dates added, this time for Capture The Magic, Soham, Cambs.)  >>>>>>

Ok so my share today is a bit of a tease really.....


I have taken a close up shot of a small portion of my most recent Funky Hand DT project which has gone live on the Get Funky and Craft blog today.
If you look at the sentiment you can guess this is a Christmas card and the trees help give that away too but it's the fabby bright colours which I love that drew me to this download collection, after 5 months of Christmas crafting already this year I really liked this complete departure from any traditionally used Christmas colours. I'd love it if you would like to pop over to the blog and take a look at the whole card. Thanks for stopping by today, Ni. X

Friday, 30 November 2012

Funky Hand & Tiddly Inks - It's Blog Hop time!

Hello! (and if you are a new visitor; then welcome, to my little paper crafting place). I'm Ni (Naomi) and a DT member for the wonderful Funky Hand.
If you are here today as a part of the combined Funky Hand and Tiddly Inks blog hop then you should have arrived here via Larrisa's blog.

Ok so without further waffling from me here is my hop card.....


I have used the super cute Cookie Bugg and extras digi stamp set from Tiddly Inks which comes with 2 sentiments, 2 bonus images and a backing paper.
To compliment the colours in the cookie I used the fabby Funky Kraft Stash backing paper download which has 3 different styles in 5 colour ways making a total of 15 papers, a great variety and so useful!

I coloured the images with promarkers, added glitter glue to the wings and used the cookie digi from the extras sheet as an embellishment.
The lighter kraft backing paper has a circle pattern on it whilst the darker one has a mottled texture effect, I don't know if you can see the detail properly in the photo though. I hope so as this is a super paper download!
I used Kraft card strips to cover the joins in the papers and for my layering. Then I made a small slit in the spine of the card and tied the sentiment panel around the whole front half and knotted it to finish off.

*****

Now when I was browsing the Tiddly Inks store another character caught my eye, and as it is December tomorrow I thought I would also share my 'Snowman Sid' creation with you. :)


Sid was also coloured using promarkers and given a sparkle with glitter glue. This card uses 2 papers from the Presents Wrapped download, the Xcut doorplate nesting die and one of the new border dies.

I hope you have enjoyed my projects today, you should now be hopping to Leah's blog or you can head to the Tiddly Inks blog to view the complete blog hop list.
Don't forget there are prizes of a $20 download voucher on offer from Christie for Tiddly Inks and also a £20 download voucher on offer from Anice for the Funky Hand site that you could be in with a chance of winning! Thanks for stopping by, I hope you enjoy all the wonderful inspiration from both DT's as you hop around. Ni. x

Thursday, 22 November 2012

New Demos, Border Dies & a Blog Hop!

Welcome to today's information posting! As the title shows the information is in 3 parts and so I shall begin.....

1. Bookings for Docrafts Card Making Demonstrations for 2013 are starting to come in, very exciting, I cant wait to start sample making again and catch up with the lovely fellow crafters that I met last year as well as seeing lots of new faces. :D
Keep an eye on the sidebar for updates in the coming weeks >>>>>

*****

2. I have uploaded these examples of the newest Xcut Border Die sets to my Docrafts gallery today but thought here on the blog would be a good place of reference for the future too.

Set 1.                                                   Set 2.
 

*****

3. As you may have seen there are changes being made to the Funky Hand DT blog and exciting things happening in the company which I can't share with you just yet BUT I do have some great news which I shall share via the picture below!


The Funkettes are all busy crafting away on our blog hop creations for the Funky Inks blog hop next Friday as I'm sure everyone over at Tiddly Inks are too. Be sure to stop by any time after 6am (GMT) to view my post and find out how you can join in and see all the other fabulous projects! :)

Wednesday, 14 November 2012

Quick Thank You Notes

Evening bloggers. :)
Tonight I am doing a quick share of some thank you cards that I have made to send to family/friends for my birthday gifts.


These simple little notelets are 4" square and made in a pearlescent cream cardstock.
First i stamped the Craftwork cards sentiment in black stazon and then used the Swiss dots embossing  folder all over the front of the card.
The flowers are all Papermania big bloomers from various ranges and the centres are an xcut snowflake punch which handily doubles as flower stamen! I used card candy in the middles of the punched shapes in coordinating colours. Perfect, cute but simple and easily replicated.

Thanks for stopping by today and once again don't forget my blog candy to win a 6 month membership to the Docrafts Creativity Club, tell your friends! :)

Friday, 9 November 2012

Stampin' Up! - Christmas Class

I recently went to my first Stampin' Up! Class which was run by my demonstrator friend. I love the way the SU products are all from the same colour palette so everything matches and how they coordinate their punches & die sets to match with their stamps, fabulous! :)


In the class we made 4 card designs, 2 of each, all using the Ornament Keepsakes stamps and matching framelits dies.

The card to the right uses the 'Greetings of the Season' Noel sentiment, a snowflake embossing folder and the branches are made by using part of an image from the Lovely as a Tree set. The holders on the baubles were created using Glass Stampin' Glitter in Champage.


This card uses Bakers Twine and Dazzling Diamonds. The sentiment is from the More Merry Messages set.


This card uses the textured impressions embossing folder, Holiday Frame, embossed onto white card and die cut with the Apothecary Accents Framelits.
The bauble was given a glittery sheen using the Shimmer Paint.

This last card has a small fault and highlights the dangers of red liner tape! I was trying to line up the white panel onto the base card and it touched in the corners and was stuck, I will trim the extra card from the side before it is sent.

This sentiment is from the Chock-Full of Cheer set. The paper piercing shape was created using the Festive template set but the shape was slightly changed to fit onto the A6 size card.


I am really pleased with these cards, I love the designs and can't wait to go to my next class. It was really nice to be taught different techniques and I have placed my first order if an SU product which I will share once it arrives and I have created a project using it.
Have a good weekend everyone.

Saturday, 3 November 2012

Creativity Club DT share - Patterns to Love.

Evening all, thank goodness it is the weekend, we've had a completely utterly manic week at work and I am truly shattered! I have had a relaxing afternoon with a little crafting and just watched Strictly!

More importantly, today's share is a card that I have made using the newest Docrafts, Creativity Club Downloads, Patterns to Love - parts 1 & 2. This is a super download using pale blue, turquoise and white in a variety of patterns all with a distressed, shabby feeling to them, they're gorgeous!


I used 2 papers from the downloads, one with the smaller pattern on and one with the larger pattern on and in a different colour way to add contrast. Can you see the distressed edge on the paper at the top, this is great for if you need a quick card or for people who are not confident at the technique.

When thinking for a focal point for this card the colour just said to me 'Tatty Ted's blue nose', so I rummaged in my stash and found this decoupage. The mount is the Xcut Doorplate die, the ribbon is from Wilkinsons new Christmas wrapping section, the sentiment is a Me to You one stuck onto one of the Xcut Tags and Bookplates die cuts and the stars were from a mini stamp set.

I have also used an exciting (well it is to me as a die cutting addict!) new product on this card too. The Xcut Border Dies, Set 1, for the double scalloped edging effect. These are 12" strips and come in packs of three and there are 3 sets. I cut the edge off the backing paper with the die first to give me a border strip (for use on another project) and this of course left the paper with the decorative edge too. I then cut the same strip from turquoise card and stuck them onto the base card against each other, simple!


DON'T FORGET! - My blog candy to win a 6 month membership to the Docrafts Creativtiy Club is still running, only another 20 or so followers to go. Again a big welcome to all my new followers, thank you for joining me and I hope you are liking what you see here. Ni. X

Thursday, 25 October 2012

Funky Hand DT card & Docrafts Daily Sketch

Good afternoon bloggers and a special welcome to my new followers, its great to have you here!

I am just stopping by today to share with you my latest DT creation for the Funky Hand challenge blog, Get Funky!
The theme this month is to make a kids Christams card and I just love the new Oh Come All Ye Crafters digi stamp download with this cute little santa in it. There are also 3 other images, you can see them and buy it here. The star backing paper is the funky freebie for this month that Anice provided, so that even if you dont own anything from Funky Hand yet then you can still take part in the challenge and be in with the chance to win a free download! :)


Here is the card blurb:
The Santa image was coloured in using promarkers, the present is an old Quickutz die and the ribbon and sentiment are from my HUGE Xmas craft stash! The green backing paper is from the Make A List download, part of the series of 8 in the new Oh Come All Ye Crafters range.

I have not added any extra embellishments to the card yet as I thought with so many patterns and layers on there already it could become a bit cluttered. I might walk away and leave it for a few days then come back to it and see what I think, sometimes it is just best not to over think it and know when to walk away! ;)

***

The layout for this card was inspired by today's free sketch download in the Docrafts Creativity Club, sorry but I wont be sharing the actual sketch here as then it wouldnt be very exclusive, would it! ;)
I loved all the layers of this sketch and as I am not good at designing a card with some many elements myself it was great to have this helping hand to start me off. The only thing is that then there was no stopping me so I added the ribbon strip and sentiment circle! To download the exclusive club members sketch pop here but be quick as there will be a new sketch uploaded tomorrow!
I hope you like todays card, dont forget my blog candy is still on and continuing until I reach 100 followers, the prize is a 6 month membership to the Docrafts Creativity Club, what a nice early christmas present that would make! Bye for now, Ni. x


Wednesday, 10 October 2012

Creativity Club DT share - Home for Christmas.

Morning bloggers, it's Wednesday so that means I am back with a new DT card for the Docrafts, Creativity Club.

This week my card uses one of the recent downloads, You & Me, which comes in 4 parts and the paper I have used for this project was in part 1.
The You & Me collection is really pretty in soft pastels with floral and bird images but I want to remind you to look at the pages individually and that you can use them in different ways and so my card today is Christmas related!


The green backing paper is the one from the Me & You download, not a flower or bird in sight so perfect for matching with other images but don't think of it as just 'plain' as there is a line/dot pattern on the paper.

The other backing paper is from the recently released Home for Christmas range as is the die cut shape and the matching patterned stamp. The sentiment is one that I cut (gasp!) out of one of the Christmas Tidings urban 4" square stamps as I really liked the fonts on it. The baubles are from the same range and have been stamped on to white card and cut out, strips of acetate have been attached to the back of the green paper and the baubles stuck to the other end so that they actually hang on the front of the card. I have covered the acetate strip with silver border peel offs.

I hope you like this card and if you are a club member already then I hope it makes you look at the huge collection of downloads in a different way! If you are not a member then don't forget that I am running my blog candy with a 6 month Creativity Club membership as the prize!

Thanks for stopping by today. I am off to a distress inks workshop as a student instead of demonstrating for a change, can't wait to learn some new skills and get inky, fun! :D

Wednesday, 3 October 2012

Creativity Club DT share - Tulip Christmas

Afternoon all, a very much later than planned post from me today but I had a friend come round to start planning a London birthday trip - sight seeing, shopping and a show, whoopee!!


Anyway..... todays card uses the new Tulip Christmas collection and is an image from one of the A4 decoupage packs (4 sheets of decoupage and 4 sheets of papers for £3, great value!) which make 8 decoupage images per pack and contain duo papers, two patterns with a border strip accross the middle to cut up as you wish.

Now my card doesnt use paper from the pack but rather a fab stripey one from the Love Christmas, Creativity Club download andmy  layout inspiration came from todays daily sketch no.94.


The flower embellishment was made using the gorgeous new Home For Christmas paper & Bloom, xcut nesting dies and was inspired by the tutorial from Jo Austin on Creativtiy TV recently. Thanks Jo! :)
Aslo used, xcut scallop broder punch, red shimmer dome stickers and Anitas sentiment ribbon.

*** I hope you like this card, dont forget to leave a comment on the original post at the top of the page, and also here to have two chances to win my fab Creativity Club 6 month menbership blog candy. Ni. x ***

Sunday, 23 September 2012

Easy Swing Card - Photo Tutorial

Good morning everyone, well finally I have made it back here to post my tutorial for the style of Swing Card (aka. Flip Card) that I shared in my previous post.

After showing this technique to a large number of crafters at my Docrafts demonstrations over recent months it was decided that my traditional style of demo freebie written tutorial sheets would be much too complicated for this technique and so a photo tutorial with notes has been created.
Bare with me, I hope it makes sense, please let me know if you think any changes need to be made and I'll update as requested. :)


Remember, I have used my parenthesis rectangle no.2 dies from xcut but you can use any symmetrical shape that has an easily identifiable centre (I will do a quick post this week showing how to easily use a circle too!). These measurements make a 5 1/4" card.

Ok so without further ado here is the tutorial in 10 very easy steps.....
*******
1. -  First take a sheet of card that measures 7 1/4" by 5 1/4".
2. - Work with the card horizontally and score at 2 3/4" and 3 3/4"

*******
3. - Next take you chosen die and place it on top of the card, lining up the centre of the die with the
2 3/4" score line.
4. - Tape the die into place with low tack tape (stick onto clothes if necessary to de-sticky it a little so it will not rip your card when removed). Place the tape over the small middle panel as shown below, this is a good visual reminder of where not to cut or you will ruin the swing mechanism!


*******
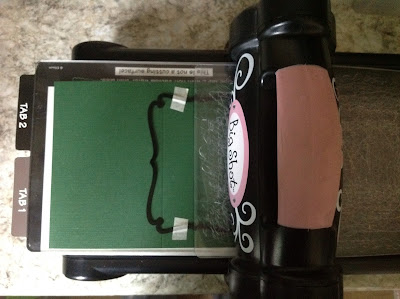
5. - Place the card on the base plate of your chosen die cutting machine and feed the top plate through and line it up with the 3 3/4" score line as shown below. Remember, don't cover the tape! Roll through your machine.
By making your sandwich is this staggered way, when you roll it through your machine you will only cut where the sandwich is complete, so in this case the small area on the right side of the score line.


*******
6. - Once out of the machine, turn your card round 180 degrees and make up a new staggered sandwich to cut the other side of the die, as again shown in the photo below. Remember, don't cover the tape! Roll through your machine.
7. - Once cut, remove the die and lay the card horizonally as before.


*******
8. - Now fold the left side of your card over towards the right edge, creasing at the 3 3/4" score line.
9. - Then fold the same side back to your left creasing on the 2 3/4" score line to give you a finished card blank that will stand like this.....


*******
10. - Decorate as required!
Remember that because you used a die to cut the shaped swing panel you can use the same die for a perfect decorative layer as on the front of my card using the tartan paper, AND you can use the smaller shapes with plain card to create a space to write your message to the recipient.


*******

Right, phew! That's it, tutorial done! Now over to you to see what you think of it!
Thanks for stoping by today, I hope it has been a useful visit and I welcome any comments. Ni. :) x